- OBJECTIVE:
- To lay down the procedure for Calibration of Refractometer (Make – Rudolph Research).
- SCOPE:
- This SOP is applicable to the procedure for Calibration of Refractometer at {Company Name} {Location}.
- RESPONSIBILITY:
- Executive/Designee Quality Control is responsible to calibrate the instrument as per SOP.
- Head QC: Ensure the compliance of SOP.
- ACCOUNTABILITY:
QA Head shall be Accountable for implementation of SOP.
- PROCEDURE:
A refractometer is a device used to measure the refractive index of a substance. The refractive index is a measure of how much light is bent as it passes through the substance. This property can be used to make a variety of assessments, such as to determine the purity of a substance, the concentration of a solution, or the type of liquid.
- Operate the instrument as per the SOP.
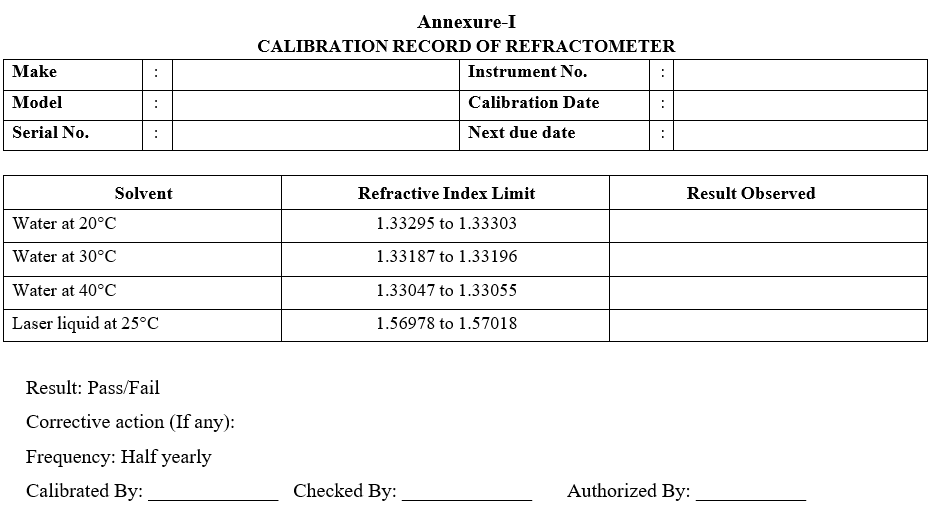
- Place water in the sample well and measure the refractive index at 20°C, 30°C, 40°C.
- Place the laser Liquid in the sample well and measure the refractive index at 25°C.
- Enter the results in calibration record as per Format-I.
- If the values do not lie within the limit, then perform two-point calibration Acceptance value for water ± 0.00004 from the standard value Acceptance value for laser liquid ± 0.00014 from the standard value.
- Two-point calibration:
- Press Set Up and key in the password
- Select User calibration/Calibrate
- After entering this menu select temperature control and key in the temperature to be calibrated
- Wipe the prism clean and then cover it by lowering the presser to exclude stray light
- Press continues, the instrument will calibrate itself on air, this will take approximately two minutes.
- When the calibration is complete the instrument will display Select Two-point calibration scale, Press the button corresponding to the scale in which you wish to calibrate.
- Place sample 1 (Usually water) that is to be used as first calibration fluid on the prism and press Done the instrument will now measure the sample, when complete it will say Enter RI of sample 1, Key in the value of sample 1.
- Place the sample that is to be used as the second calibration fluid on the prism and press done the instrument will now measure the sample, when complete it will say Enter RI value of sample 2, key in the value of sample 2.
- Press Continue, Back, exit to return to main menu
- To obtain an accurate calibration the sapphire prism must be completely covered with fluid. If the message Calibration difference >0.01 appears this indicates that there may be a problem with the calibration. Usually this may be due to entering wrong value and the solution is to abort the calibration and repeat.
Click the link for download word file copy of this document:
https://pharmaguidehub.com/product/calibration-of-refractometer-make-rudolph-research/
- REFERENCES:
Not Applicable
- ANNEXURES:
| ANNEXURE NO. | TITLE OF ANNEXURE |
| Annexure-I | Calibration Record of Refractometer |
ENCLOSURES: SOP Training Record.
- DISTRIBUTION:
- Controlled Copy No. 01 : Head Quality Assurance
- Controlled Copy No. 02 : Head Quality Control
- Master Copy : Quality Assurance Department
- ABBREVIATIONS:
| No. | : | Number |
| SOP | : | Standard Operating Procedure |
| QC | : | Quality Control |
- REVISION HISTORY:
CHANGE HISTORY LOG
| Revision No. | Details of Changes | Reason for Change | Effective Date |
| 00 | New SOP | Not Applicable | To Be Written Manual |
Annexure-I
CALIBRATION RECORD OF REFRACTOMETER

Click the link for download word file copy of this document:
https://pharmaguidehub.com/product/calibration-of-refractometer-make-rudolph-research/
