- PROCEDURE:
- Flow Accuracy Test:
- Fix the Union/Restriction Capillary in the column compartment.
- Keep degassed water (milli Q) in channel ‘A, B, C and D’ and prime the channels thoroughly. Keep the degasser mode on and stabilize for about each 15 min. with a flow rate of 1 ml /min.
- Take a 10 ml calibrated volumetric flask and dry it.Set 1.0 mL/min flow for channel A when the flow and pressure are stable, insert the outlet tubing into the volumetric flask and immediately start a calibrated stopwatch.
- Stop the stopwatch when the bottom of the meniscus reaches the 10 ml mark on the flask.
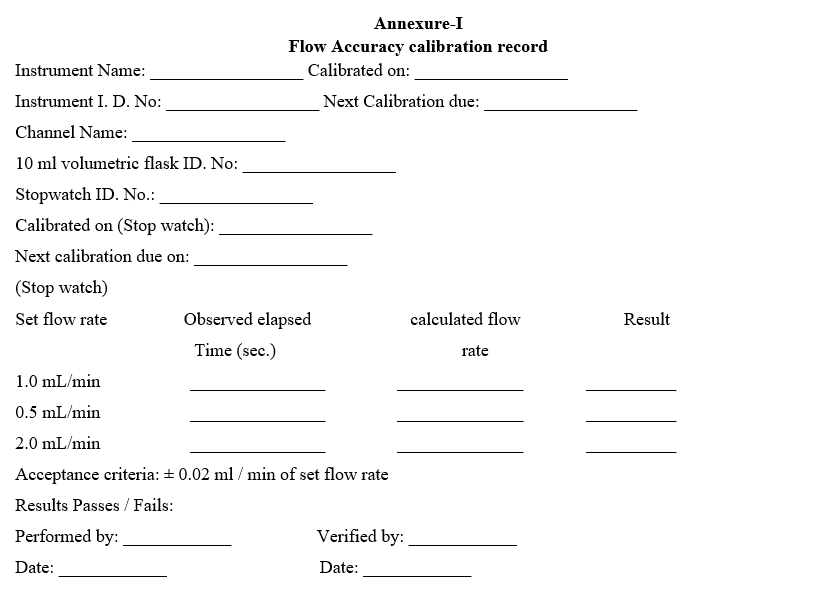
- Record the elapsed time in seconds.Calculate the flow rate using the following equation: “Calculated flow rate = (10.00 ml/ measured time in seconds) x 60”.
- Similarly test the flow rate accuracy with flow rates 0.5 mL/min and 2.0 mL/min and record the calculated flow rate.
- Similarly test the flow accuracy for Channel B, C and D.
- Acceptance criteria: ± 0.02 mL/min of set flow rate.
- Record the results in calibration record as per Format-I
Calibration schedule: Once in 6 months and after any major maintenance job.
Oven Temperature Accuracy:
- Set column oven temperature to 10ºC and stabilize for about half an hour.
- Keep the temperature probe of Digital thermometer inside the oven compartment and allow stabilizing the reading.
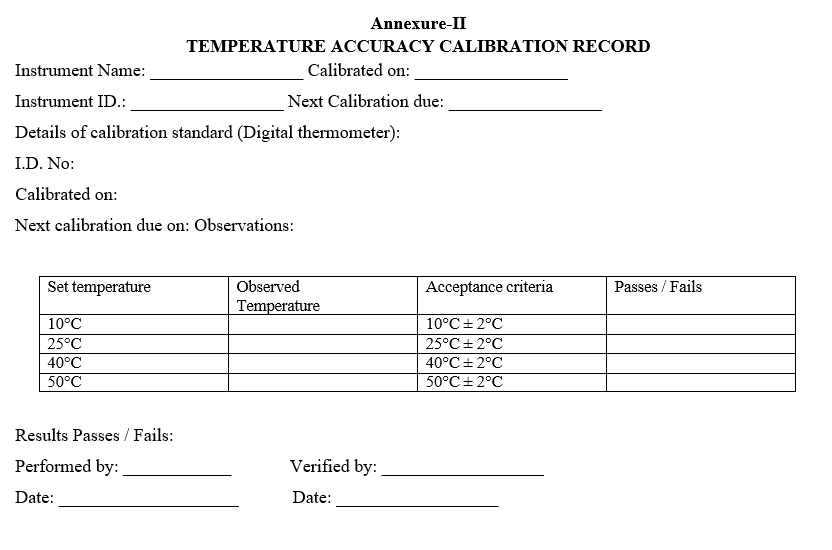
- After stabilization of the temperature, note down the reading as per Format-II.
- Repeat the above two steps for the temperatures 25ºC, 40°C and 50 °C respectively.
- Acceptance criteria: ± 2ºC of set temperature.
- Record the results in the calibration record as per Format-II.
Calibration schedule: Once in 6 months and after any major maintenance job.
Note: In case of column oven heater the calibration will be done from 25ºC to 50ºC, and for oven cooler heater from 10ºC to 50ºC as mentioned above.
- Sampler Cooler Temperature Accuracy:
- Set the temperature at 5ºC from the key pad of the instrument.
- Insert the Calibrated thermometer sensor in the middle of the sample compartment.
- Wait about 30min to stabilize the sampler cooling temperature.
- Check the temperature of the calibrated thermometer and note the readings.
- Verify the temperatures at 10ºC and 25ºC respectively.
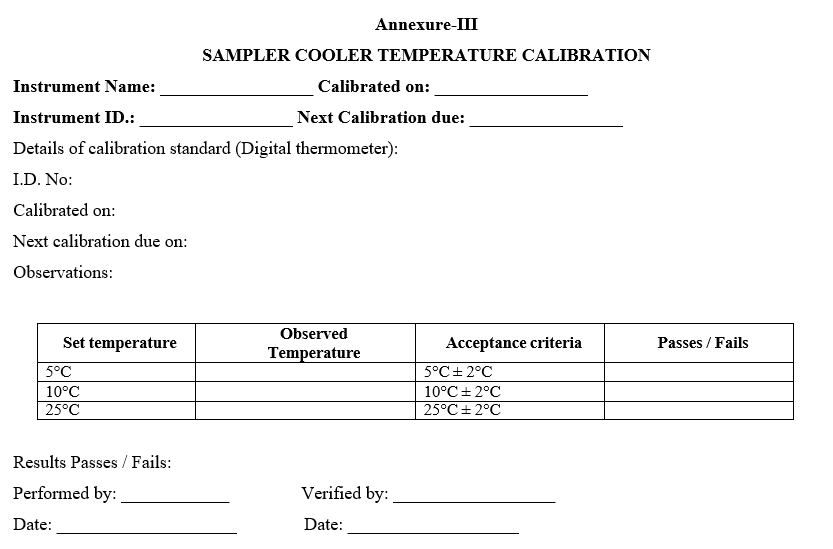
- Acceptance criteria: ± 2ºC of set temperature.
- Record the results in the calibration record as per Format-III.
Calibration schedule: Once in 6 months and after any major maintenance job.
Detector Calibration:
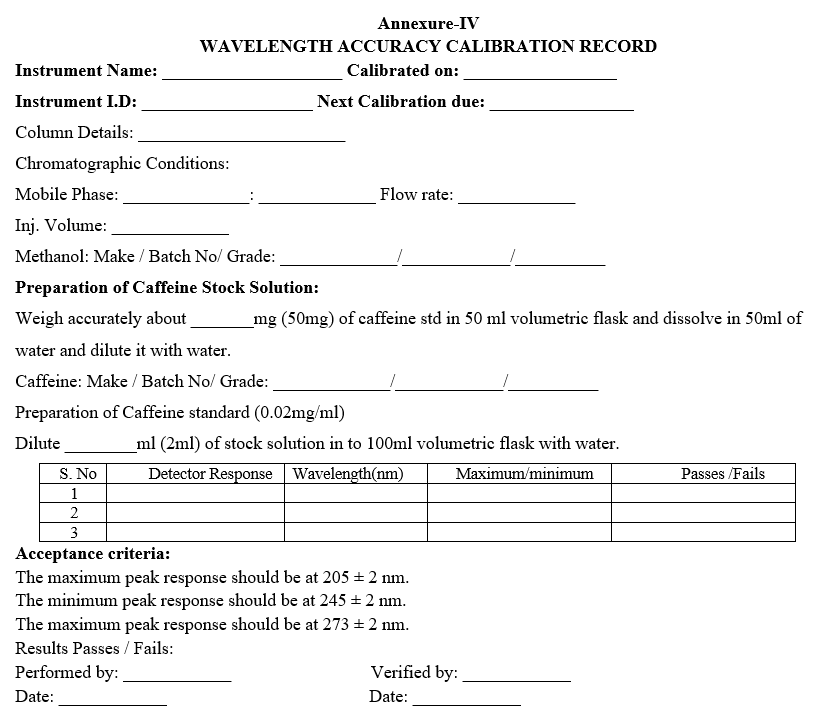
Wavelength Accuracy:
- Operate the instrument as per SOP.
- Weigh accurately 50 mg of caffeine working standard into a 50ml volumetric flask, dissolve and dilute to 50 ml with water.
- Dilute 2 ml of the above solution to 100 ml with water (0.02 mg/ml).
- Prepare filtered and degassed mobile phase mixture of Water and methanol in the ratio of 70: 30.
- Fix the Column (Symmetry C18, 4.6mm x 75mm 3.5μm/ X Bridge C18,4.6 mm x 50 x 3.5 μm/or equivalent,) in the column compartment.
- Place the mobile phase and stabilize for 30 minutes at a flow rate of 1.0 ml/min.
- Set the wavelength as 201 nm and Column temperature as 25°c.Inject the 0.02mg/ml solution each time with the following parameters by varying the wavelength from 201 nm to 209 nm, 241 nm to 249 nm and 269nm to 277 nm with 1 nm frequency.
- Run time 5 min and injection volume 10µl, Perform duplicate injections at all wavelengths.
- In case of 2998 PDA detector select the following parameters in instrument method.
- Wavelength range: 190 to 370 nm
- Resolution: 1.2 nm
- Sampling rate: 2.0 spectra/sec
- Auto exposure: on
- Lamp: on
- Interpolate 656 nm: on
- Filter response: 1 sec
Inject 0.02 mg/ml of caffeine in duplicate and after to completion of the run, extract the spectrum from 201 nm to 209 nm, 241 nm to 249 nm and 269nm to 277 nm.
Acceptance Criteria:
The maximum peak area response should be at 205 ± 2 nm.
The minimum peak area response should be at 245 ± 2 nm.
The maximum peak area response should be at 273 ± 2 nm.
- Enter the results in calibration record as per Format-IV.
- Calibration schedule: Once in 6 months and after any major maintenance job.
Note: If the calibration is performed continuously, no further stabilization is required for injector linearity, detector response linearity and wavelength accuracy.
- Detector Linearity:
- Fix the Column (Symmetry C18, 4.6mm x 75mm 3.5μm/ X Bridge C18, 4.6 mm x 50 x 3.5μm/or equivalent,) in the column compartment.
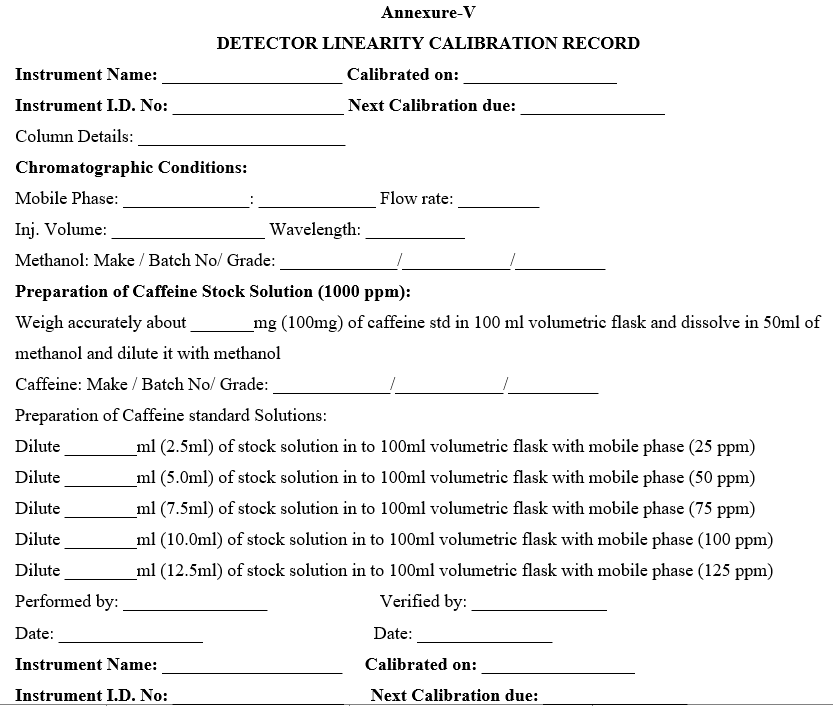
- Prepare the degassed mobile phase mixture of Water and methanol in the ratio of 70: 30, Prepare caffeine working standard solution of 25ppm, 50ppm, 75ppm, 100ppm, and 125ppm concentration from stock solution using mobile phase as diluents.
- Preparation of Caffeine Standard Stock solution (1000ppm): Weigh accurately about 100 mg of caffeine working standard and transfer in to 100 ml volumetric flask dissolve and dilute to volume with methanol. Operate the instrument with the following chromatographic conditions.
- Wavelength: 273 nm.
- Flow rate: 1.0 ml / min.
- Injection volume: 10ml.
- Run time: 5minutes.
- Temperature: 25°C.
Preparation of Caffeine Standard solutions:
- Dilute 2.5 ml of stock solution to 100 ml with mobile phase (25ppm).
- Dilute 5.0 ml of stock solution to 100 ml with mobile phase (50ppm)
- Dilute 7.5 ml of stock solution to 100 ml with mobile phase (75ppm).
- Dilute 10.0 ml of stock solution to 100 ml with mobile phase (100ppm)
- Dilute 12.5 ml of stock solution to 100 ml with mobile phase (125ppm)
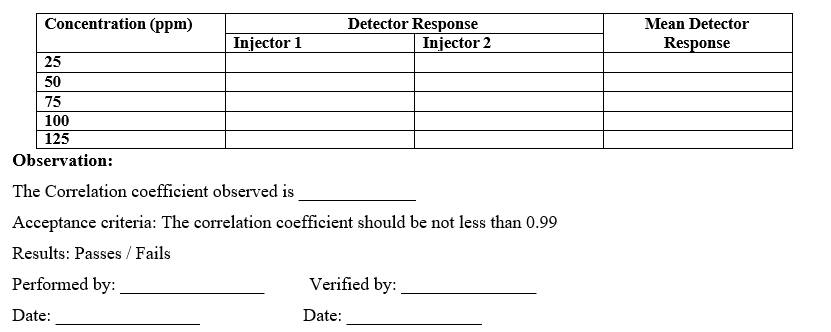
- Separately inject the above solutions in duplicate and calculate the average peak area response.
- Plot the graph of detector response VS concentration and calculate the detector linearity in terms of correlation coefficient.
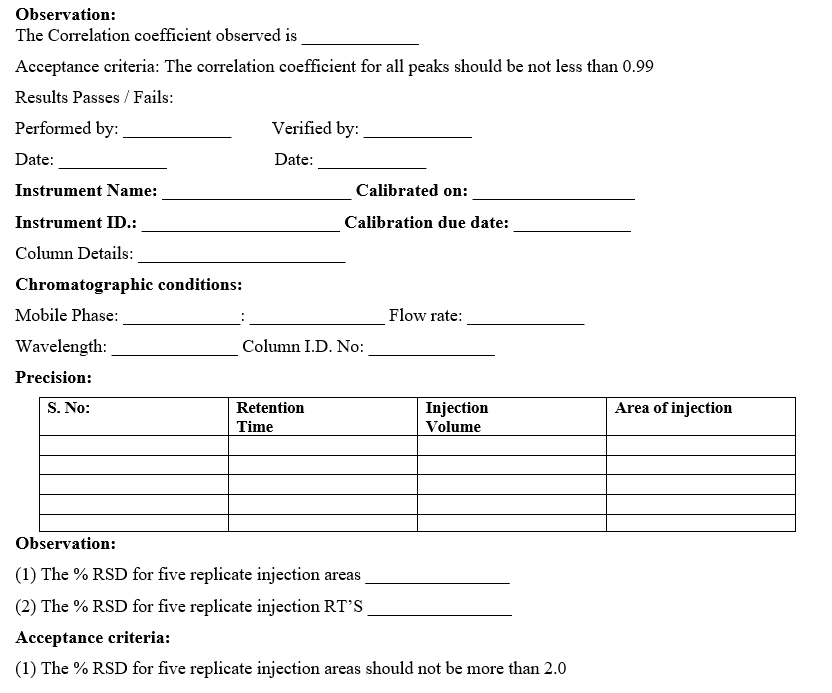
- Acceptance criteria: The correlation coefficient should be not less than 0.99.
- Enter the results in calibration record as per Format-V.
- Calibration schedule: Once in 6 months and after any major maintenance job.
- Injector Precision and Linearity Test:
- Precision
- Keep mobile phase (Water and methanol in 70:30 ratio) in channel A stabilize for 10 minutes at a flow rate of 1.0 ml/min.
- Fix the column (Symmetry C18, 4.6mm x 75mm 3.5μm/ X Bridge C18,4.6 mm x 50 x 3.5 μm/or equivalent,) in the column compartment.
- Place the 10ppm caffeine solution (Dilute 10 ml of 100ppm caffeine standard solution to 100ml with mobile phase) sample in carousel.
Follow the chromatographic conditions for precision:
- Wavelength: 273 nm
- Flow rate: 1 ml /min
- Injection volume: 10μl (For 100 and 200μl loop) 20μl (For 500μl loop)
- Run time: 5 minutes
- Temperature: 25°C
- Inject standard solution five times in to the chromatogram and measure the peak area response.
- Acceptance criteria: The %RSD area of replicate injections is not more than 2.0 % The %RSD RT of replicate injections is not more than 1.0 %.
Linearity:
- Wavelength: 273 nm
- Flow rate: 1 ml /min
- Injection volume:
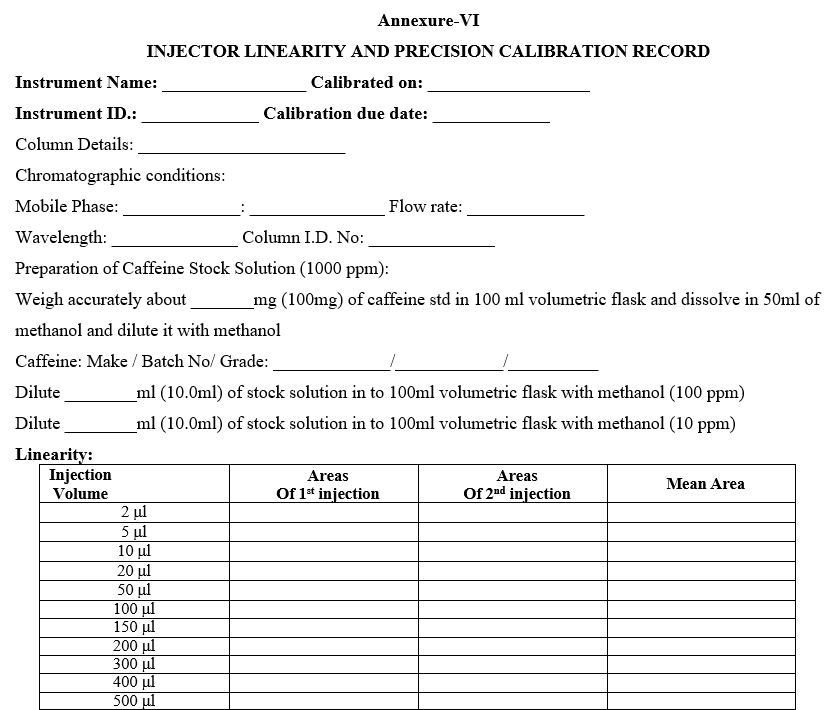
- For 100μl loop: 2μl, 5μl, 10μl, 20μl, 50μl and 100μl
- For 200μl loop: 5μl, 10μl, 20μl, 50μl, 100μl, 150μl, 200μl
- For 500μl loop: 20μl, 50μl, 100μl, 200μl, 300μl, 400μl and 500μl
- Run time: 5 minutes
- Temperature: 25°C
- Separately Inject standard solution with above mentioned injection volume in duplicate and measure the average peak area response.
- Plot the graph of detector response VS injection volume and calculate the injector linearity in terms of correlation coefficient.
- Acceptance criteria: The correlation coefficient should be not less than 0.99.Enter the results in calibration record as per Format-VI.
- Calibration schedule: Once in 6 months and after any major maintenance job.
Note: In case of PDA detector, Wavelength accuracy, Detector Linearity and Noise & Drift Tests shall be performed.
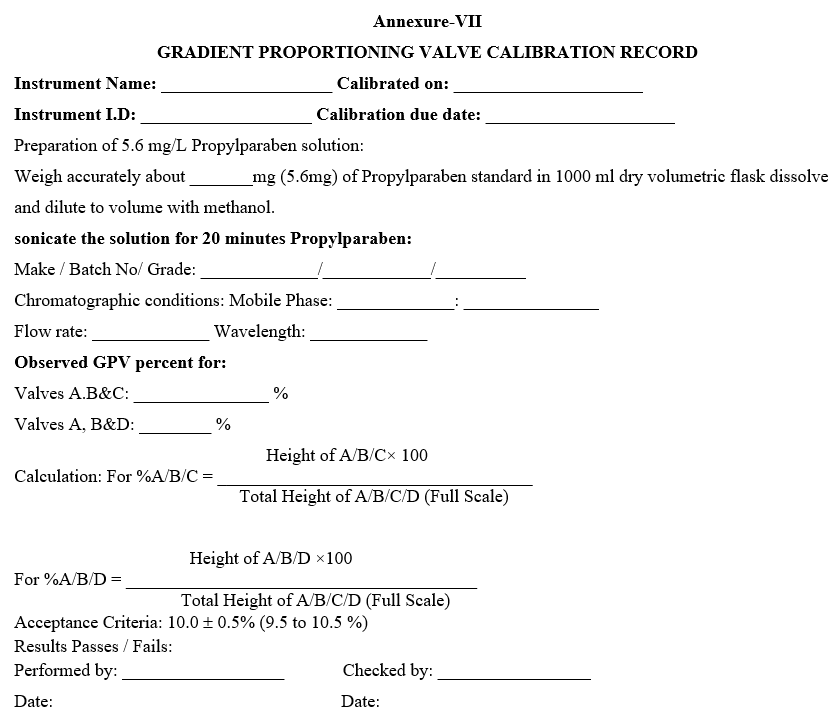
- GRADIENT PROPORTIONING VALVE TEST:
Preparation For the GPV Test
- Fill the reservoir for A and B lines with methanol.
- Fill the reservoir for C and D Lines with 500 ml of methanol containing 5.6 mg/L propylparaben / or 1 ampoule of GPV test solution (ref: waters part no WAT042876, per 500 ml solution).
- Note: Preparation of 5.6 mg /L propylparaben solution: Take 5.6 mg of propylparaben in1000 ml dry volumetric flask, dissolve and dilute to volume with methanol. Sonicate the solution for 20 minutes.
- Prime the pump.
- Run the inline degasser for 10 minutes.
- Create an instrument method with following parameters.Wavelength – 254nm.
- Flow – Gradient (program given below)Accept default settings for other parameters.
- In case of 2998 PDA detector select the following parameters in instrument method.
- Wavelength range: 254 nm
- Sampling rate: 1.0 spectra/sec, minimum.
- Resolution: 1.2 nm.
- Auto exposure: yes
- Filter response: 1 Sec
- Ensure the digital filter is selected
- Check Gradient Proportion table as follows.
| Time | Flow | %A | %B | %C | %D | Curve |
| Initial | 2.00 | 50 | 50 | 0.0 | 0.0 | 11 |
| 2.00 | 2.00 | 0.0 | 0.0 | 50.0 | 50.0 | 11 |
| 6.00 | 2.00 | 50 | 50 | 0.0 | 0.0 | 11 |
| 10.00 | 2.00 | 45 | 45 | 10.0 | 0.0 | 11 |
| 12.00 | 2.00 | 50 | 50 | 0.0 | 0.0 | 11 |
| 14.00 | 2.00 | 45 | 45 | 0.0 | 10.0 | 11 |
| 16.00 | 2.00 | 50 | 50 | 0.0 | 0.0 | 11 |
| 18.00 | 0.00 | 50 | 50 | 0.0 | 0.0 | 11 |
RUN THE GPV TEST:
- Run the single injection with 18 minutes run time using the above created method set and prepare and injection icons.
- Acceptance criteria: 10 ± 0.5 %.
- Record all the results in the calibration record as per Format -VII.
Note: Peak height is based on the average height along the flat area at the top of the peak. If not adjust as necessary.
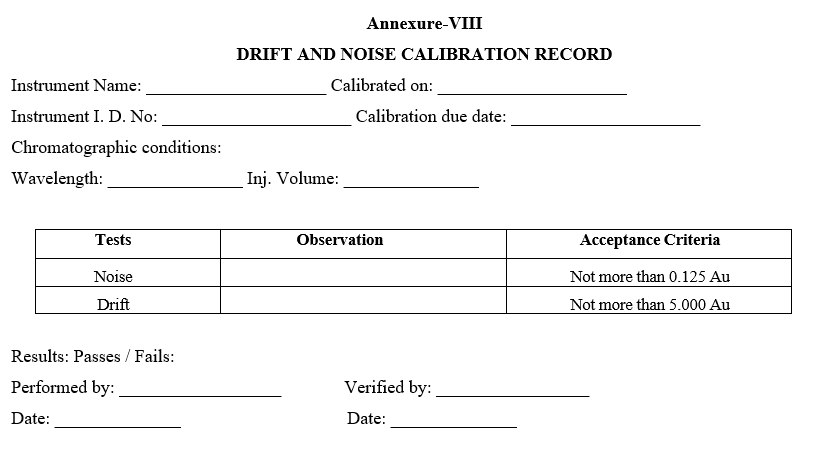
- TEST FOR NOISE AND DRIFT:
- Stop flow from the separations module. Purge the detector flow cell with nitrogen and allow it to stay for 1 hour.
- Create new instrument method, click on 2690/5 module and select flow as 0.00 ml and accept default settings for all other parameters.
- Click on W2489 detector icon and select wavelength as254 nm.
- In case of 2998 PDA detector select 2D mode in detector and select wavelength as 254 nm.
- Give single injection in sample set, select injection volume 0 µL, vial no.=1 and run time = 60 minutes.
- After instrument has stabilized, click on prepare for injection icon and after 2 minutes click on inject icon.
- Acceptance criteria: The noise should not be more than 0.125 Au and drift should not be more than 5.000 Au.
- Enter the results in calibration record as per Format-VIII.
- Calibration schedule: Once in 6 months and after any major maintenance job.
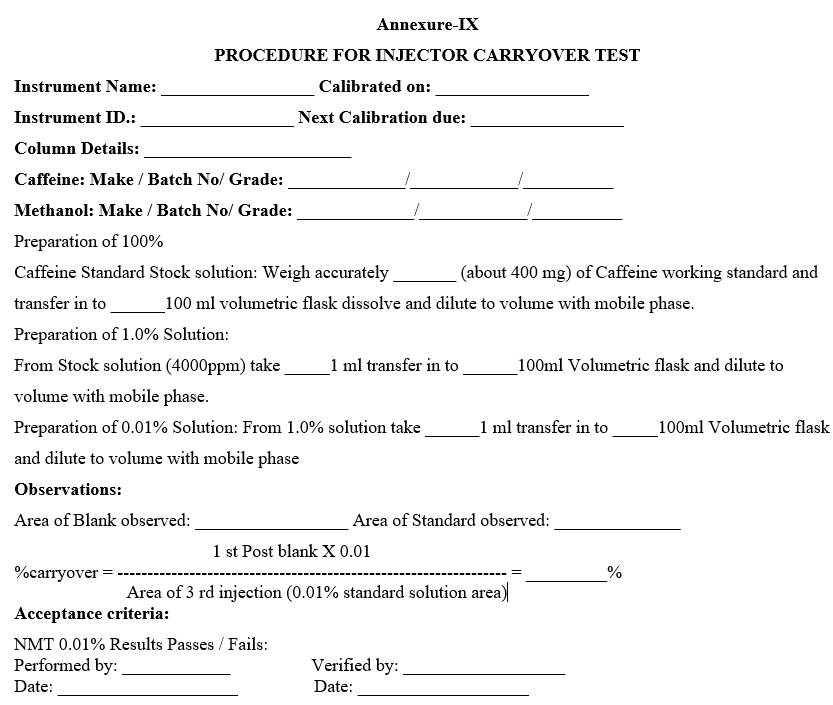
- Procedure for Injector carryover test:
- Preparation of 100%Caffeine Standard Stock solution: Weigh accurately about 400 mg of caffeine working standard and transfer in to 100 ml volumetric flask dissolve and dilute to volume with mobile phase (Water and methanol in 70:30 ratio).
- Preparation of 1.0% Solution: From Stock solution (4000ppm) takes 1 ml transfer in to 100ml volumetric flask and dilute to volume with mobile phase.Preparation of 0.01% Solution: From 1.0% solution take 1 ml transfer in to 100ml volumetric flask and dilute to volume with mobile phase.
- Keep mobile phase (Water and methanol in 70:30 ratio) in channel A stabilize for 10 minutes at a flow rate of 1.0 ml/min.
- Fix the column (Symmetry C18, 4.6mm x 75mm 3.5μm/ X Bridge C18,4.6 mm x 50 x 3.5 μm/or equivalent,) in the column compartment Operate the instrument with following chromatographic conditions:
- Wavelength: 273 nm
- Flow rate:1.0 ml / min
- Injection volume: 20μl
- Run time: 5 minutes
- Run time: 15 minutes for 100% Caffeine Standard Stock solution
- Temperature: 25°C
- Inject the blank solution two times(Pre Blank) then 0.01% standard solution of three times next 100% Caffeine Standard Stock solution one injection followed by three more blank (Post Blank) injection, measure the peak area response in blank solution after the standard injection as per the below formula.

- Enter the details in calibration record as per Format-IX.
- Acceptance criteria: Not more than 0.01 %.
- ANNEXURES:
| ANNEXURE NO. | TITLE OF ANNEXURE |
| Annexure-I | Flow Accuracy calibration record |
| Annexure-II | Temperature accuracy calibration record |
| Annexure-III | Sampler Cooler Temperature Calibration |
| Annexure-IV | Wavelength Accuracy Calibration Record |
| Annexure-V | Detector Linearity Calibration Record |
| Annexure-VI | Injector linearity and precision calibration record |
| Annexure-VII | Gradient proportioning valve calibration record |
| Annexure-VIII | Drift and noise calibration record |
| Annexure-IX | Procedure for Injector carryover test |
Annexure-I
Flow Accuracy calibration record
Annexure-II
TEMPERATURE ACCURACY CALIBRATION RECORD
Annexure-III
SAMPLER COOLER TEMPERATURE CALIBRATION
Annexure-IV
WAVELENGTH ACCURACY CALIBRATION RECORD
Annexure-V
DETECTOR LINEARITY CALIBRATION RECORD
Annexure-VI
INJECTOR LINEARITY AND PRECISION CALIBRATION RECORD

Annexure-VII
GRADIENT PROPORTIONING VALVE CALIBRATION RECORD
Annexure-VIII
DRIFT AND NOISE CALIBRATION RECORD
Annexure-IX
PROCEDURE FOR INJECTOR CARRYOVER TEST
