- OPERATING PROCEDURE OF BULK PACKING LINE:
- 30 BPM, PHARMAPACK
- Pre Start up:
- Check and ensure that equipment is cleaned and affixed with “CLEANED” status label.
- Check and ensure the temperature and RH of the room are within the limits.
- Get the line clearance from IPQA personnel, before starting the operation.
- Check and ensure the compressed air supply NLT 6 kg/cm2.
- Start up:
- Remove the cleaned status label and affix the ‘UNDER PROCESS’ label.
- Transfer the change parts used in the primary/secondary packing as per the specific product requirement from the change parts cell.
- Production Executive shall issue require no. of pre-marked bottles (Red marked) as per size requirement for setting purpose and mention the same in Format for Reconciliation of Empty Bottles used for machine setting and after completion of machine setting same shall be reconciled and recorded in the same format.
- Transfer the dispensed materials from the Packing Material Dispensing room to the primary packing area / De-cartooning room / Secondary packing room as per BPR.
- Transfer the approved tablets / capsules of required quantity as mentioned in the BPR from the manufacturing area to primary packing area.
- Ensure the power supplies in main control panel RYB lights are glowing.
- OPERATION:
- OPERATION OF HIGH SPEED BOTTLE UNSCRAMBLER MACHINE:
- Adjust the speed of the bottle turn table as per requirement.
- Adjust the bottle cleaning unit guide as per bottle size.
- Ensure the cleaning unit shall be in center position for proper cleaning of bottles.
- OPERATION OF AUTOMATIC TABLET / CAPSULE COUNTER MACHINE
- Remove Funnel Clamp by loosing knurl screws and put the funnel in the funnel holder, which is suitable for product container.
- “Switch ON” the main power supply and turn “ON” the compressed Air Valve.(Maintain air Pressure 4.50 -7.00 bar).
- Turn the key of the machine into “ON” position on Control Panel.
- Adjust the container guide bar by loosing knob, such that the container’s centre is in line with center of the funnel.
- Adjust the Container presence sensor according to the height of the container.
- Adjust the funnel height by touching UP/DOWN icon in ‘Manual Interface’ (Screen-7). The gap between container mouth and funnel should be minimum to avoid escape of product during filling.
- Adjust the container gate and stopper in such a way that, the gate should stops and release container without damage to the container.
- Check for Free movement of the container on the conveyor, Funnel up and down movement, Functioning of three vibrator plates and proper releasing of containers in ‘Manual’ mode.
- Load the Tablets/ Capsules manually in to the hopper and close the hopper lid. Adjust the “Hopper Gate” of Automatic Tablet / Capsule Counter Machine for free flow of Tablets/ capsules.
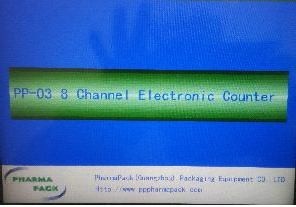
- When key of control panel is turned to “ON” position, then first screen will be displayed (See Screen-1). Press the touch screen at the middle on words “PP-03 8 Channel Electronic Counter”, then password screen will be displayed.
Enter the password of desired User level (Like Operator as User Level-1, Supervisor as User Level-2, Manager as User Level-3 and Administration as User Level-4) and respective password by using the numerical key pad which appears on screen and press “Log in” (See Screen-2) that appear the screen as shown in the Screen-3.

- Press GREEN push button on control panel to start the “Driver Power”.
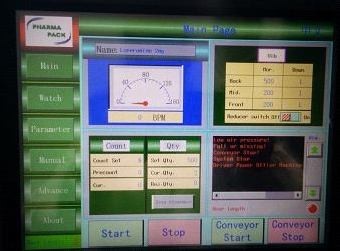
- On Main Interface (Main Page)(See screen-3), following icons are present like “Name” to input Product name; “Start” to start the machine, “Stop” to stop the machine, “Count” to Set the number of products to be filled in to container.
- “Conveyor Start” to Start the conveyor, “Conveyor Stop” to Stop the conveyor, “Vib” for vibrator adjustment of respective plate, “Qty” for quantity input or modification, “Zero clearance” to clear actual data.
- User can select any icon by pressing on the respective icons in touch screen of HMI individually, to set the parameters and to run the machine. Also one can switch to other interface by touching to these icons like “MAIN”, “WATCH”, “PARAMETER”, “MANUAL”, “ADVANCE”, and “ABOUT”.
- Vibrator Speed Adjustment can be done by pressing the “Vib” icon (The speed is between 0-1000)
Back: The last level vibrator near hopper.
Mid.: The middle level vibrator.
Front: The first level vibrator at tablets exit.
Reducer-Switch: Speed reduction switch (ON/OFF)
- When the Speed reduction switch is “OFF” position, speed reduction function stops and vibrator works at normal speed. When speed reduction switch is “ON”, speed reduction function starts. The counting device and vibrator works at reducing speed.
- When product in the hopper is full (i.e. when product is on or above the product level sensor present in the hopper) vibration will works in “Nor”.
- When the product in the hopper below the product level sensor present in the hopper, vibration will works in “Down”.
- Count column: Counting quantity, pre-counting quantity and Current counting setting can be done in this area of “MAIN” interface (See screen-4).
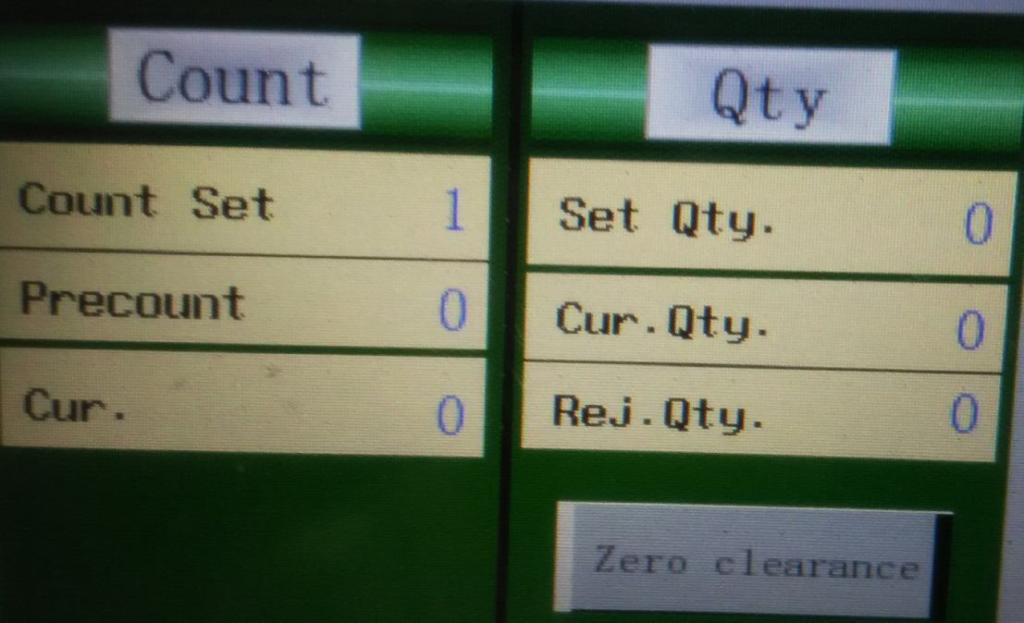
- Qty column: Number of containers to be filled shall be set on “Set Qty.”, “Cur. Qty.” and Rej. Qty. shall represent the number of containers filled and rejected at particular time during running.
- Zero Clearance enables “Cur.Qty.” and “Rej.Qty.” to Zero number.
- Count Column Count Set : Set pre-counting quantity, means Tablets/ Capsules quantity for each bottle, by small numeric keyboard which displays on HMI screen automatically after touching the box. Precount : Set pre-counting quantity Curr. : Check the output quantity, which cannot be input or modified.
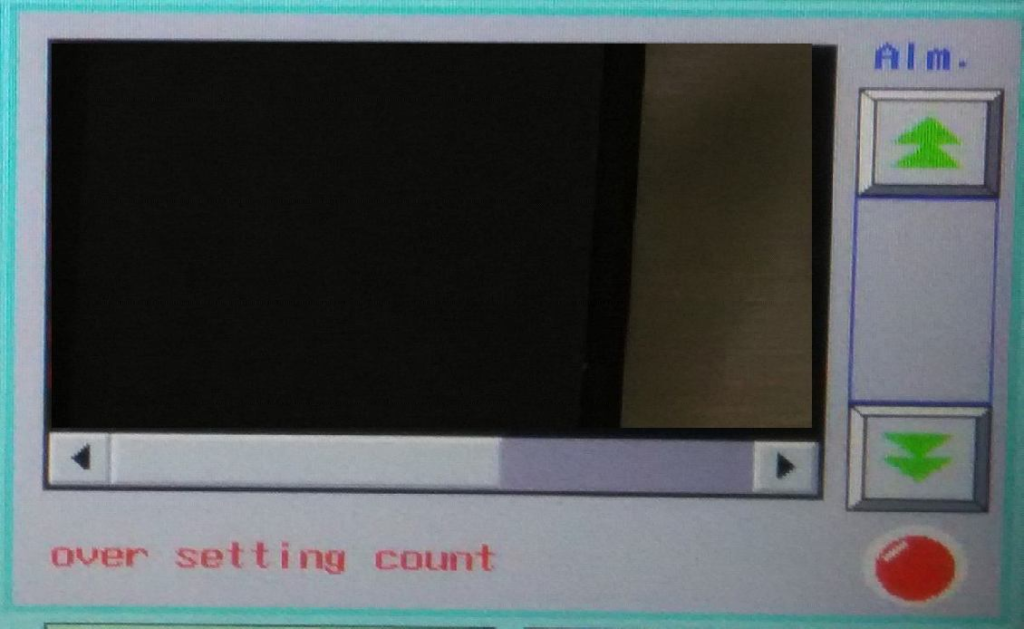
- Alarm Information: When counter gives alarm, this list will display related information which is real-time. This list will automatically clear the alarm information after the alarm is eliminated.
- Watch Interface: This interface is used to monitor length of Tablets/Capsules and distance between Tablets/Capsules.

- The longest time (Max. Length), the shortest time (Min. Length), and min. interval (Min. Interval) for tablets passing sensor, can be observed on this interface to fix proper length, interval gate delay, and vibration speed.
- Press “Zero clearance” icon to clear all data.
- Parameter Interface: On pressing this “Parameter” Icon interface one can modify parameters.
- Nozzle Vibration including “Up Time” and “Down Time” shall be modified by the user.
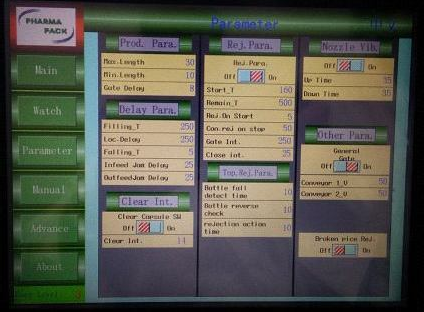
- Prod. Parameter: It includes –
- Max. Length,
- Min. Length
- Gate Delay
- Delay Parameter: It includes –
- Filling Time Loc.
- Delay Falling Time
- In feed Jam Delay
- Out feed Jam Delay
- Reject Parameter: “Rej. Para” icon it includes –Reject Switch (ON/OFF)
- Start_T (Start Time)
- Remain_T (Remaining Time)
- Rej. On Start (To reject container at start)
- Con. Rej on stop (To stop after continues rejection)
- Gate Int. (Gate Interval)
- Close int. (Closing Interval)
- General Gate It includes General Gate Switch (ON/OFF)
- Conveyor1_V (Speed of 1 st
- Conveyor) Conveyor2_V (Speed of 2 nd Conveyor)
- Manual Interface: This interface for manual operation.
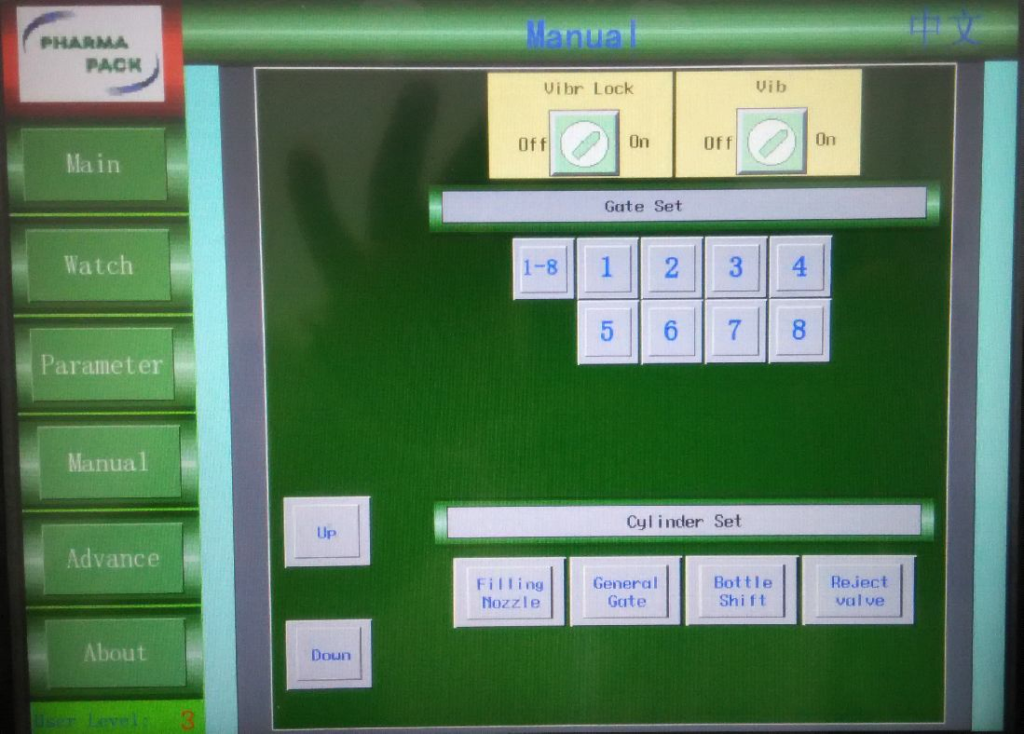
- [Vibr Lock]: This Vibr Lock (ON/OFF) knob is use for locking or unlocking the vibrator.
- [Vib]: Vibrator Switch, when the switch is OFF, vibrator cannot work after counter starts up. Vibrator can work only when the switch is ON.
- [Gate Set]: A button for controlling ON/OFF of tablet gates (1-8) means simultaneously open or close 8 tablet/capsule gates.
- [Filling Nozzle]: A button for controlling nozzle lower done or rise.
- [General Gate]: A button for controlling ON/OFF of general gate, this operation is enabled only if general gate switch is ON.
- [Bottle Shift]: A button for operating location cylinder for bottle filling.
- [Reject valve]: Manually operate reject valve.
- [Up]: Up button for controlling elevator to move upward (movement of counter machine to adjust the funnel height with the bottle).
- [Down]: Down button for controlling elevator to move downward (movement of counter machine to adjust the funnel height with the bottle).
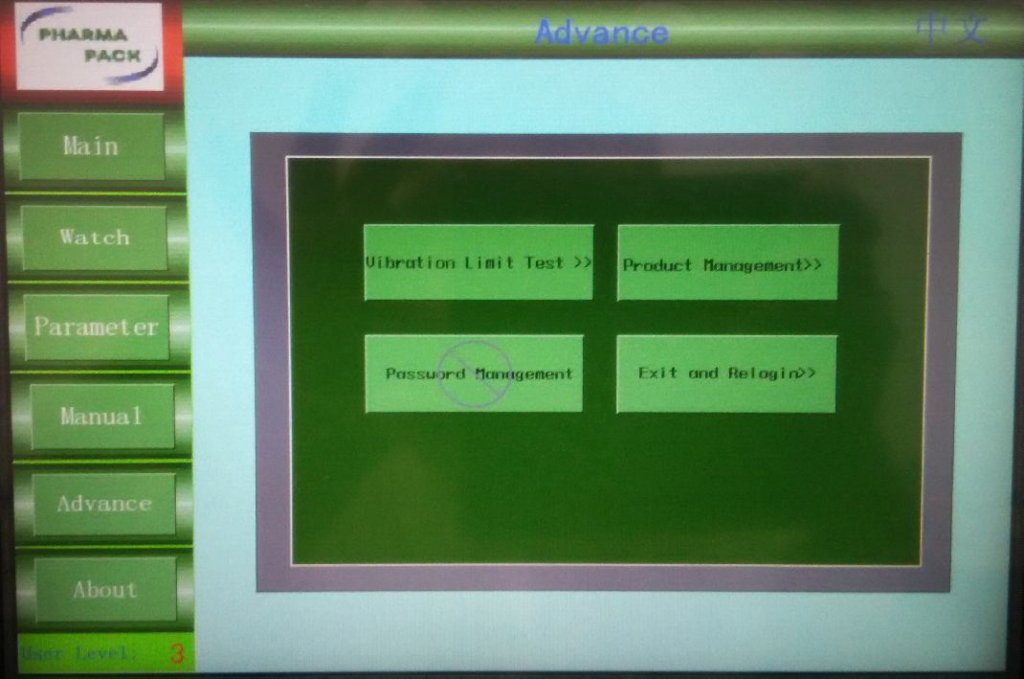
- “ADVANCE” (Available at User Level-3): Press “ADVANCE Icon on “Operation Main Interface”, then following screen will be displayed.
- From this Advance interface one can switch to different interfaces like – “Vibration limit test”, “Product Management”, “Password Management”, and “Exit and Re login”.
- To change the settings through this interface requires password. One has to press “Exit and Re login” and enter the correct password, then only one can enter and change the settings in this interface.
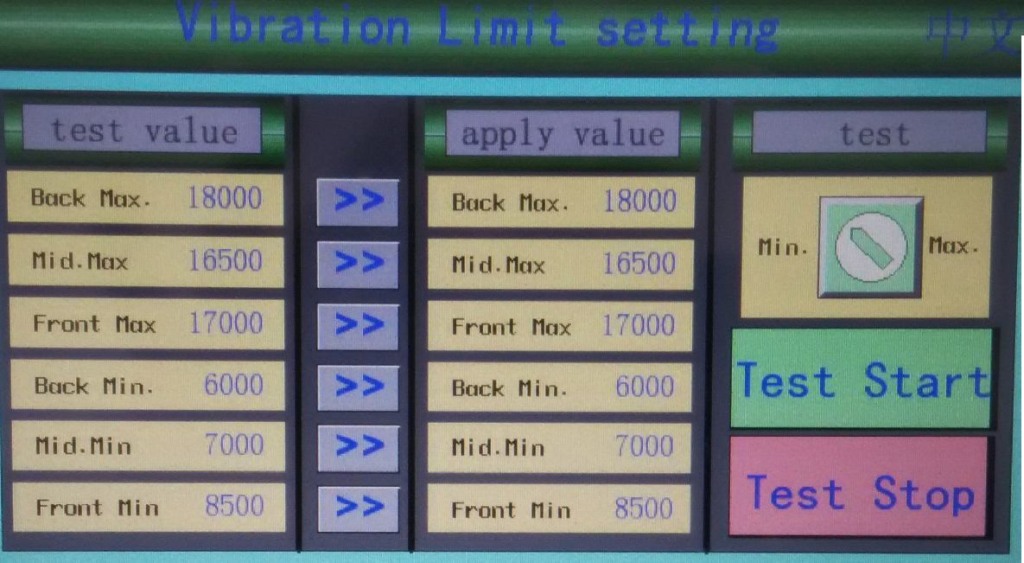
- For Vibration Limit Press “Vibration Limit Test” in ‘ADVANCE Interface’, then following ‘Limit Test Interface’ will be displayed. This interface is used to adjust vibration limit of vibrator, for protecting vibrator and extending its service life.

- During test, the upper limit or lower limit of vibrator will be adjusted by this “Min./Max.” Icon.
- To test upper limit, turn the switch to “Max.”. Then input vibration value of three-level vibrator in “Upper Limit Test Value”. Back” means hopper vibrator, “Middle” means middle vibrator, “Front” means tablets exit vibrator.
- After finishing inputs, press “Test Start”, then the vibrator works at the input value.
- After modifying, press “Test Stop”, to stop the test. Then press “ >>”, to apply relative values to production.
- After successful application, “Upper Limit Applied” is equal to “Upper Limit Test Value”.
- On “MAIN” interface, the largest vibration value, that is 1000, is the upper limit of vibrator.
- The vibrator lower limit test is similar to the upper test.
- On “MAIN” interface, the smallest vibration value, that is 0, is the lower limit of vibrator.
- [Product management]: Press “Product management” icon in “ADVANCE” interface.
- On this interface one can observe, modify and transfer production data.
- Name can be set or modified via textbox.
- Other parameters can’t be modified.
- Save: Press “Save” button to upload and save current parameters of counter to the touch screen.
- Call: press “Call” to download current parameters recorded in the touch screen to counter.
- Press “Down” to check the previous record of touch screen.
- The current record no. can be checked via “index”.
- Press “Up” to check the next record of touch screen.
- The current record no. can be checked via “index”.
- Password Management: Press “Password Management” icon in ADVANCE interface to manage Password
- Ensure the hopper gate proper flowing of tablets/capsules.
- Adjust the vibrator speed in running condition.
- Vibrators speed should be adjusted in such a way that, the Back Vibratory Plate (below the hopper) speed is less than the other two.
- On front Vibratory Plate, tablets/capsules should flow individually before entering into the tablet upper guide block.
- Check the counted container manually as to get same no. of tablets/capsules set in the memory.
- Once parameter setting in HMI & required inputs to HMI is over, start the conveyor by pressing “Conveyor Start” icon in “Main” Interface.
- Press the “Start” icon in “Main” to start the Automatic Tablet/Capsule counter Machine (Run the machine in Auto mode).
- After completion of batch or to stop the machine, press “Stop” icon in Operation Interface.
- Press BLACK push button to stop the “Driver Power” of Automatic Tablet/Capsule counter Machine.
- Press ‘RED EMERGENCY PRESS’ button to stop the entire line in case of emergency.
- During packing operation, intermittently verify for accumulation of dust particles on infrared sensors and clean the sensors if necessary.
- After completion of the batch switch of mains and update the status label as “TO BE CLEANED”.
- Record in process details in the BPAR.
- Record the operations in equipment log sheet.
- OPERATION OF CHECKWEIGHER:
- Operate the machine as per SOP.
- OPERATION OF LABELING MACHINE:
- Set up of labelling unit:
- Load the label role on the label role disc.
- Guide label to go through transition roller-1, transition roller-2, label damp press board, label sensor, transition roller. Then pull out the clamp of label body paper, encircle label around axis of body paper withdrawing. Then insert clamp of label body paper to press the label body paper. Finally clockwise rotate the axis of body paper withdrawing and also make body paper encircles for 2-3 circles.
- Align the labelling unit according to the height of container.
- Label press board must be pressed on the label. When label encircles the main axis, pull up the handle and make press roller and main roller separate from each other. After finish encircling label, tighten the press handle.
- Make sure that there is no label present before the label sensor on the label roll
- Printing Unit Set up:
- Remove the printer head from printer.
- Take the metal stereos from packing Supervisor/In charge and arrange them on the printer head as per details in the BPR.
- Replace the printer head.
- Check the condition of hot stamping foil.
- Adjust the printing unit as per the space provided for coding details on label.
- OPERATION PROCEDURE
- Take one good print and check all the printed data against the BPR.
- Then take the approval from the production Executive and finally take from the IPQA Executive.
- After getting the approval, start the labelling machine and introduce containers for labelling.
- Perform the entire challenge test as per BPR.
- If the entire challenge test get pass then start the production activity. Perform the in process checks as per BPR during batch running.
- Check the condition of hot stamping foil.
- Adjust the printing unit as per the space provided for coding details on label.
- Remove the printer head from printer.
- Take the metal stereos from the packing Supervisor/In charge and arrange them on the printer head as per details in the BPAR.
- Replace the printer head.
- Check the condition of hot stamping foil.
- Adjust the printing unit as per the space provided for coding details on label.
- Usage of MMI screen
- Switch ON mains.
- Turn the main power key in ON position, following screen-10 will be displayed
- Click the first interface, input the password, and then ‘Main Operation Interface’ will be displayed. Press GREEN push button of the control panel to start the motors.


- Main Operation Interface: From this interface operator can Start / Stop the machine by pressing [START] or [STOP] icons. Also this interface displays current running speed, current output, current product name, current label quantity and can set the output. Operator can switch to Parameter, Manual operation and Alarm interface by touching on MANUAL, PARAMETER and ALARM icons on PLC as shown above.
- Touch on MANUAL icon in the Main Operation interface to go the Manual operation screen. Manual checking of Label Out can be performed by touching on the Label Out icon. Conveyor jog can be performed manually by touching on the conveyor jog icon.

- To go to the Parameter option touch on the Parameter icon in the main operation interface then the next screen will appear as shown below:

- To set parameters for new product or to change parameters of running product touch on the Log Off icon in the main parameter menu as shown in above. The next screen will appear as:

- Touch on Enter and then input the correct password of Required user level.
- Now touch on running parameter icon as. The next screen will appear.

- To set all the required parameters in the 1st screen touch on the required field then a numerical on screen key pad will display. Put the required value and then enter. Then touch on the down arrow key displayed in the right side bottom corner of the PLC screen. The next screen will appear

- Put the required parameter values and activate required functions. Then touch on the down arrow key displayed in the right side bottom corner of the PLC screen. The next screen will appear

- Set all the required parameters and then touch on the down arrow key to go to the 4th page of the Parameter setting screen. The next screen will appear:

- set all the required parameters and then touch on the down arrow key to go to the Last page of the Parameter setting.

- Set all the required parameters. After setting all the required parameters touch on Parameter icon to go to the main parameter screen. Now touch on Log off icon then touch on Enter and then input the password of User level 1.
- To check and clear if any fault alarm indicates then touch on Alarm icon in the main Operation interface, the next screen will appear.

- Then touch on the alarm list to view the fault alarm list.

- Check the fault list and rectify the problem and then touch on Alarm clear. Alarm will clear only after rectification of the problem.
- Operation of wrap-around labeler machine:
- Turn ON the key and connect the power supply. Press GREEN button to start the machine.
- Perform the challenge test for Pharma code by defacing the bar or extra bar and enter the details in respective BPR before starting the operation date.
- Continue the operation and perform the in-process checks as per BPR and record it in BPR.
- After completion of batch or to stop the machine, press BLACK button. For emergency stopping the machine in EMERGENCY, press Red EMERGENCY PUSH button.
- Adjustment of machine as per container shape (Round):
- Adjust the guide according to the container dimensions (For round containers)
- Fix feeder and move vertical pressing device to forward.
- Adjust the vertical pressing device assembly forward / backward as per the container size.
- Adjust the wrap belt height using hand wheel.
- During providing any joints between the labels, ensure that adequate space is provided between successive labels.
- After completion of batch or to stop the machine, press BLACK button. For emergency stopping the machine in EMERGENCY, press RED EMERGENCY PUSH button.
- ANNEXURES:
| ANNEXURE NO. | TITLE OF ANNEXURE |
| Annexure-I | Labelling machine Stoppage Format |
- ABBREVIATIONS:
| No. | : | Number |
| BPR | : | Batch packing record |
| SOP | : | Standard Operating Procedure |
ANNEXURE-I
LABELLING MACHINE STOPPAGE FORMAT


