
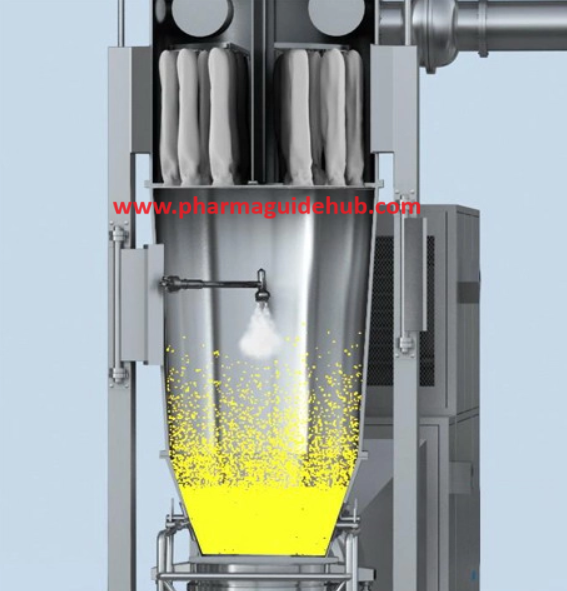
- Fluid bed equipment with a top spray is a type of equipment used for processing particles in a fluidized state. The fluidized state is achieved by passing air upwards through a perforated plate, which suspends the particles in a turbulent motion. This creates a highly uniform environment for processing the particles.
- CLEANING PROCEDURE:
- Pre starts up:
- Check and ensure that the equipment is affixed with “cleaned” status label.
- Check the room temperature and humidity as per the specification mentioned in the BMR to be processed.
- Remove the “Cleaned” label and affix under process label over the equipment.
- Starts up:
- Check and ensure the Lower plenum, Product Container, product container mesh filter and its silicon gasket, Filter bags are fixed in their place as per the product.
- Check the integrity of the product bowl mesh and Silicon gasket.
- Transfer the product bowl, which is to be fluidized nearer to the FBP.
- Ensure proper earthling of equipment.
- Check and ensure the required compressed air pressure (6 bars) supply.
- Check the container seal pressure and filter seal pressure (4 bars).
- OPERATION:
- SET UP:
- Fix the product bowl to the equipment.
- Switch ‘ON’ the equipment.
- Touch screen of the equipment displayed equipment name, model and its manufacturer’s name.
- Press the ‘START’ key on the above screen, and then the following MENU screen will be displayed.
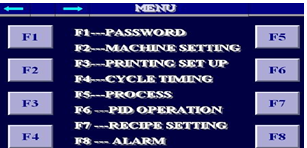
MENU SCREEN
- The following functions are available in the MENU screen.
- F1—Password -Touch F1 icon to enter the password screen.
- F2—Machine Setting. -Touch F2 icon to enter Machine setup screen
- F3—Printing set up -Touch F3 icon to enter Print set up screen.
- F4—cycle Timing – Touch F4 icon to enter Cycle time screen.
- F5—Process – Touch F5 icon to enter Process screen 4.3.5.6F6—PID Operation – Touch F6 icon to enter PID Operation screen.
- Recipe setting. – Touch F7 icon to enter Recipe setting screen.
- F8—Alarm. – Touch F8 icon to enter Alarm screen.
- Touch forward arrow (®) icon to enter the next screen, then the following screen will be displayed.
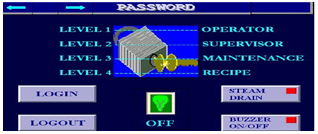
- Touch LOGIN icon in the above screen and enter the required level of Password by using popup key pad. Touch the 0-9 key for the numerical keypad, give the respective password, then touch the enter key. Then touch the → key to move to next level from the present level.
- Level 1—- Operator.
- Level 2—- Supervisor.
- Level 3 —- Maintenance.
- Level 4 —- Recipe.
- Touch right arrow key in the above screen or by touch ‘F2’ key the following screen will be displayed for Machine setting. The following functions area available in this screen.
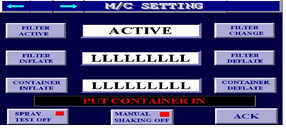
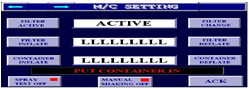
MACHINE SETTING SCREEN
- ‘Filter active’ Icon is used to “Active” or lock the filter bag or Lock the filter bag
- ‘Filter Change’ icon is used to Unlock/deactivate the filter bag.
- Filter inflate’ icon is used to start ‘Filter Seal Inflation’
- ‘Filter Deflate’ icon is used to start ‘Filter Seal Deflation ’.
- ‘Cont. Inflate’ icon is used to Start Container Seal Inflation.
- ‘Cont. Deflation’ icon is used to Start Container seal Deflation.
- ‘Spray ON/ OFF icon is used to test the spay pump operation or spray pattern.
- ‘Manual Shaking Off’ icon is a momentary key, used to shake the filter bag manually
- ‘ACK’ icon is used to acknowledge the alarm if any.
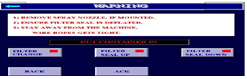
- Press filter change icon to enter the next screen. The following screen will be displayed
- WARNING SCREEN
- ‘Filter change’ icon can use for filter bag change.
- ‘Filter seal up’ icon is use for getting filter bag up.
- ‘Filter seal down’ icon is use for getting filter bag down.
- ‘ACK’ icon is used to acknowledge Alarms if any.
- ‘F3’ Key: Touch this Screen it displays the ‘PRINT HEADER on touch Screen, this is having the following parameters. Set the parameters by pressing the numerical block.
- Product code.
- Product Name.
- Batch No/Lot No.
- Batch Size.
- Operator Name.
- Recipe No
- TIME SETTING SCREEN
- “F5” KEY: Touch this key, the following screen shall be displayed the ‘PROCESS’ menu. This screen will show Set, in/Max. & Actual value indication of the various parameters. Parameters like Inlet Temp, Product Temp, Exhaust Temp, Exhaust flap % opening can be entered in this screen.
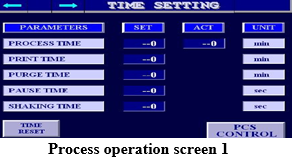
- Process On/Off’ is a toggle button used for process ON or OFF.
- ‘Heater ON/OFF’ is a toggle button used for Heater ON or OFF.
- ‘Manual Shaking ON/OFF’ is used to shake the filter bag manually.
- ‘Spray ON/OFF’ is used for Spray ON or OFF.
- Press right arrow key (®) in the above screen then the following screen will be displayed.

- Set the required parameters like Dew Point, spray pump RPM in the above screen.
- Process On/Off’ is a toggle button used for process ON or OFF.
- Dehumidification Manual is a toggle button used for dehumidification of inlet air.
- Spray On/Off is a toggle key to switch on /off of top spray.
- Touch ‘PCS CONTROL’ icon in the Time setting screen (F4) then the following screen will be displayed. This screen will help to transfer wet material from RMG to FBE and transfer of dried material from FBE to PCS for unloading/milling of dried material. Set the suction time, Discharge time and shaking speed of PCS in this screen
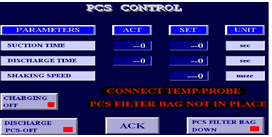
- Charging Off’ icon is used for charging of wet material from RMG to FBE.
- ‘Discharge PCS –Off’ icon is used to make discharge powder system off.
- ‘PCS Filter Bag Down’ icon is use for getting filter bag down.
- Note: During unloading of dried material from FBE, the ‘PCS Filter bag down’ function should be in off condition.
- ‘F7’ KEY (or) RECIPE: This key is for creating a new Recipe. When touch ‘LOAD’ icon, the operator panel displays list of Recipe files available in memory. The required recipe can be selected with cursor up/down arrows. Press SAVE icon to save the created recipe & touch DELETE icon to delete the unwanted Recipe.
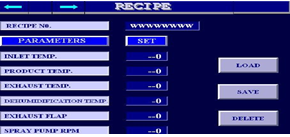
The following parameters can be set in the Recipe file:
- Inlet temperature.
- Product Temperature.
- Exhaust Temp.
- Dehumidification Temp.
- Exhaust Flap
- Spray pump RPM
- F8’ KEY (or)ALARM KEY This key is for the safety of the equipment and the operation from this we read the problem during the operation.
- OPERATION:
- Drying
- Touch the F2 icon (Machine set up screen) in the main screen and touch filter Change icon then the following screen will be displayed.
- Press and hold ‘Filter Seal Up’ icon in the above screen, then press ‘Filter active’ in machine setting screen. Filter will active with green indication color.
- Touch the ‘Filter inflate’ in the machine set up (F2) screen to inflate the filter. Filter will seal with green indication color.
- Put the container in and Connect the product Temperature probe to the product container and press ‘container inflate’ icon in the Machine Set Up screen. Container will seal with green indication.
- Charging of Wet mass From RMG to FBE:
- Connect one end of hose pipe to RMG wet co mill discharge chute and other end to the FBE charging port.
- Go to PCS control screen (step no3.3.14), touch ‘Charging Off’ icon to on position. Exhaust blower of FBE will start automatically.
- Run the RMG discharge cycle and charge the entire material from RMG to FBE.
- After charging of material disconnect the hose pipe from RMG and FBE and fix dummy plate in charging port.
- Load the required Recipe by touching F7 Key. Touch the F3 icon for print setting; enter the required data for print setting.
- Touch cycle time setting (F4) icon to set the process time, Touch Process screen(F5) and touch the PROCESS OFF icon to switch on the process.
- After air drying of material switch on the Heater by touching Heater OFF icon.
- Once the machine is set, allow the machine to run by pressing the process ‘ON’, Heater ‘ON’.
- Continue the process and periodically check sample for loss on drying.
- Check the drying efficiency in between the process by collecting the sample from the sample collecting point; do racking in between as per the BMR.
- In case required parameters are not achieved, then change the menu as per the requirement.
- After completing the operation touch the ‘PROCESS OFF’ key on the touch screen.
- Shake the filter bag and wait for few minutes.
- Unload the material by switch on the PCS in the ‘PCS control screen’ or manually in to the co mill for milling of dried material.
- Note: Connect pneumatic pipes to the discharge port pneumatic cylinder before starting of discharge operation by PCS.
- Return to the screen “machine operation”, remove the temperature probe and deflate “Container Deflate”.
- Remove the product container.
- Update the operation details in equipment logbook.
- OPERATION:
- Top spray:
- Load the required material to be granulated in the FBE bowl.
- Open the dummy plate of FBE Port and Fix the required Top spray gun assembly to the FBE.
- Connect the atomization air and needle operation air to the gun assembly, open the compressed air regulator and set the required atomization air pressure with pressure regulator.
- Connect the peristaltic pump solution pipes one end to the gun assembly and another end of pipe to the solution tank.
- Set the required parameters like inlet temp, product temp, exhaust temp, blower speed, due point, atomization air and peristaltic pump speed as per BMR.
- Set the process time, shaking time, and pause time in the time setting screen (F3).Follow the above said procedure for filter and container seal.
- Touch the Process ON/OFF function, Heater ON/OFF function in ‘PROCESS SCREEN1’ to switch on the process.
- Touch the ‘SPRAY ON/OFF’ icon in the above screen to start the spraying of solution.
- Continue the process and check the physical appearance of the granules by using sampling port of the equipment.
- After completion of granulation process dry the granules as per BMR.
- After completion of activity record the operation details in the equipment logbook.
- SHUTDOWN: Switch ‘OFF’ the equipment by pressing the ‘PUSH’/ ‘PULL’ button on the support column of the equipment
- REFERENCES:
- Not Applicable
- ANNEXURES:
- Not Applicable
- ENCLOSURES: SOP Training Record.
- DISTRIBUTION:
- Controlled Copy No. 01 : Head Quality Assurance
- Controlled Copy No. 02 : Head Production
- Master Copy : Quality Assurance Department
- ABBREVIATIONS:
| No. | : | Number |
| SS | : | Stainless steel |
| BMR | : | Batch manufacturing record |
| BPR | : | Batch packing record |
| SOP | : | Standard Operating Procedure |
- REVISION HISTORY:
- CHANGE HISTORY LOG
| Revision No. | Details of Changes | Reason for Change | Effective Date |
| 00 | New SOP | Not Applicable | To be written manual |