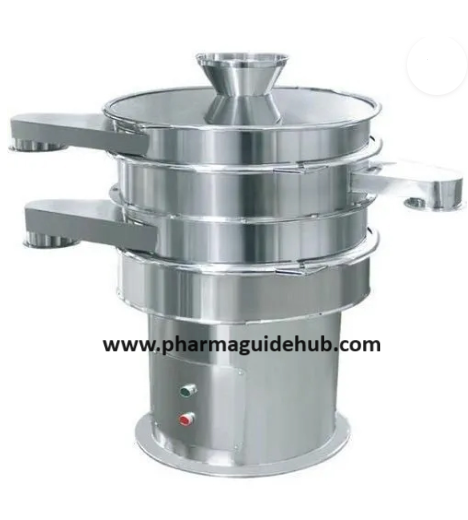
- A vibro energy sifter, also known as a vibratory sifter, is an industrial machine used to separate materials based on their particle size. It utilizes vibration to make the material travel across sieve meshes, separating the larger particles from the smaller ones .
- Type “A” Cleaning procedure:
- Ensure that status label shall be updated as “TO BE CLEANED”.
- Ensure that the sifter main is switched off before cleaning.
- Remove labels, materials, and containers of previous batch.
- Remove any adhering material from the outer surface of sifter using vacuum cleaner.
- Remove the hopper, spacer frame, table frame and sieve by de-clamp the TC clamp.
- Dedust the inner surface of the sifter with vacuum cleaner to remove the adhering material.
- Check the sieve for its integrity and fix all the dismantled parts after cleaning.
- Wipe out the adhered powder from the outer surface of the sifter using dry lint free cloth.
- Update status label as “CLEANED”.
- Record the cleaning details in equipment logbook.
- Frequency: After every batch of the same product.
- TYPE “B” CLEANING:
- Ensure that status label shall be updated as “TO BE CLEANED”.
- Ensure that sifter mains are switched off and cover all the electrical points with polythene cover.
- Remove any material, labels and containers of previous product from the sifting area.
- Remove the hopper (Top lid) and vent filter by declamp the tri-clover clamp.
- Remove the spacer frame (upper deck) and sieve by declamp the tri-clover clamp.
- Release the lower clamp and remove the table frame (lower deck) and gasket.
- Keep all dismantled parts properly on S.S. pallet.
- CLEANING OF MAIN BODY AND AREA:
- Remove any adhering material to the sifter body using vacuum cleaner.
- Wipe the body with dry lint free cloth to remove the adhering material.
- Wipe the body with lint free cloth dipped in Potable water until no adherent material is seen followed by wiping the sifter body with lint free cloth dipped in purified water.
- Finally wipe the sifter body with dry lint free cloth.
- Wipe the walls, ceiling, door, and glass with dry lint free cloth and mop the area with disinfectant solution.
- Transfer the dismantled parts to the washing area after affixing “TO BE CLEANED” label using trolley.
- CLEANING OF SIFTER PARTS:
- Clean the parts with 25 Liters of potable water using nylon scrubber until no adherent material is visible.
- Rinse the parts with 20 L of potable water.
- Finally rinse the parts with 20 L of purified water.
- Clean the vent filter with sufficient quantity of potable water followed by rinse with purified water.
- Finally dry the vent filter with a jet of compressed air.
- Wipe the gasket with lint free cloth dipped in purified water.
- Wipe the cleaned parts with dry lint free cloth followed by using compressed air.
- Transfer the cleaned and dried parts to the cleaned area after affixing “CLEANED” label.
- Assemble the dismantled parts in the reverse order of dismantling and close all the open parts using shrink film.
- The status label shall be updated as “CLEANED”.
- Record the cleaning details in equipment logbook.
- NOTE:
- Store the cleaned sieve individually covered with shrink film in the sieve holder and label it as “CLEANED” mentioning all the details given in the cleaned label.
- Check the integrity of the sieve before and after cleaning. In case of any damage to the sieve; send the damaged sieve to maintenance after raising “work order”.
- Note for Type B Cleaning:
- For Type B Cleaning first clean the equipment with lint free cloth then after clean with potable water. If needed the equipment surface can be rubbed with nylon brush or lint free cloth. If a product is not clean with water, then a cleaning agent can be added in potable water. Then after rinse with potable water and followed the rinsing of equipment with purified water. After rinsing equipment shall be dry with compressed air then wipe with lint free cloth. After drying the surface of equipment shall be wiped with 70% IPA.
- Frequency:
- After every batch of the same product from higher to lower strength and lower to higher strength.
- For Product-to-Product changeovers.
- Major breakdown of equipment.
- As when required.
- REFERENCES:
- Not Applicable
- ANNEXURES:
- Not Applicable
- ENCLOSURES: SOP Training Record.
- DISTRIBUTION:
- Controlled Copy No. 01 : Head Quality Assurance
- Controlled Copy No. 02 : Head Production
- Master Copy : Quality Assurance Department
- ABBREVIATIONS:
| No. | : | Number |
| SOP | : | Standard Operating Procedure |
| IPQA | : | In Process Quality Assurance |
- REVISION HISTORY:
- CHANGE HISTORY LOG
| Revision No. | Details of Changes | Reason for Change | Effective Date |
| 00 | New SOP | Not Applicable | To be written manual |


