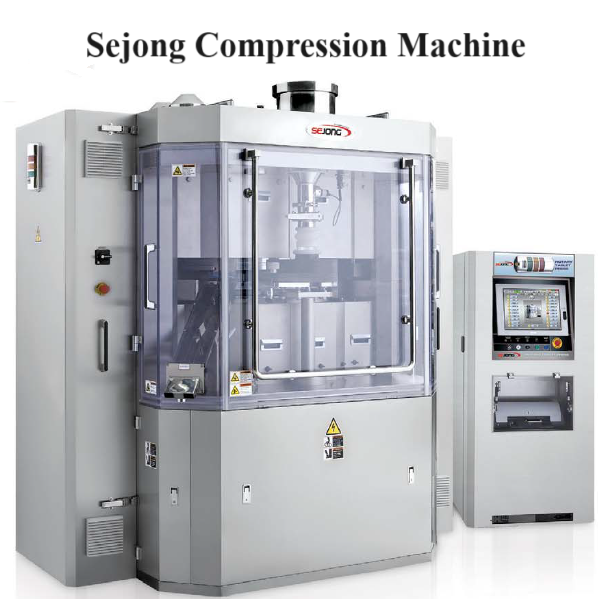
- A tablet compression machine, also known as a tablet press, is a mechanical device that uses pressure to compress powder into tablets of uniform size, shape, and weight . These machines are vital in the pharmaceutical industry for producing tablets containing medication, but they also have applications in the food, cosmetics, and chemical industries.
- CLEANING PROCEDURE FOR COMPRESSION MACHINE -37 STATIONS:
- Make & Model: Sejong MRC-37
- TYPE “A” CLEANING:
- Status label shall be updated as “TO BE CLEANED”.
- Remove the powder from the feeder by inching the feeder and collect the powder in to a polybag and send the material for destruction
- Switch ‘OFF’ the mains of the machine.
- Labels, materials and containers of previous batch shall be removed from the compression area.
- Open all four doors on the upper part and remove any material adhered to the inner and outer surfaces of the machine shall be cleaned with vacuum cleaner and wipe with dry lint free cloth.
- CLEANING OF FEEDER AND UPPER PUNCH:
- Loosen the feeder lock.
- Loosen the safety bolt and pull the feeder outward to disengage from the support base plate.
- Rotate the feeders by hand and check for free movement of blades.
- Remove any adhering material inside and outside surface of the machine using vacuum cleaner.
- Wipe out the adhered powder using dry lint free cloth.
- Remove the upper punch guard cover.
- Remove the upper guide rail by loosening the safety rail bolts.
- Remove the punches one by one and fix the back after cleaning the punches with lint free cloth. Use the hand wheel to rotate the disk.
- Repeat the same for remaining punches. Refix the upper punch.
- Cleaning details shall be record in the equipment logbook.
- Frequency: ® Shall be performed between batch-to-batch changeovers.
- TYPE “B” CLEANING:
- Status label “TO BE CLEANED” shall be updated.
- Labels, materials and containers of previous batch shall be removed from the compression area.
- Remove the powder from the feeder by inching the feeder and collect the powder in to a poly-bag and send the material for destruction.
- Switch off the mains to the machine.
- Open all four doors on the upper parts; remove the powder adhering with vacuum cleaner.
- Dismantle the hopper, feeder, ejection station, hose pipes of dust collector and discharge chute.
- DISMANTLING OF HOPPER AND CONNECTORS:
- Remove the hopper, bellow and acrylic tube of the hopper.
- Take out the hopper and keep the dismantled parts over SS trolley after affixing TO BE CLEANED label.
- Remove all adhering material by using vacuum cleaner.
- DISMANTLING OF FEEDER:
- Loosen the feeder supporting bolts.
- Disengage the clutch from the support plate.
- Pull the feeder outward to disengage from the support plate.
- Open the acrylic guards with the help of screwdriver.
- Remove the feeder inlet clamp, Feed pan, Paddles and Feed bowl by loosening the screw.
- Place all the above dismantled parts over SS trolley and transfer them to washing area after affixing “TO BE CLEANED” label in closed condition.
- REMOVAL OF UPPER PUNCHS:
- Remove the upper guide rail by loosening the safety rail bolts. Rotate the hand wheel by using hand to release the punches from the cam.
- Rotate the hand wheel to release the punches from the cam.
- Remove the upper punches one by one and place them on tray.
- Wipe the punches with lint free cloth followed by lint free cloth dipped in IPA.
- Finally wipe the punches with dry lint free cloth.
- Remove the Lower Cam Guards.
- REMOVAL OF LOWER PUNCHES:
- Remove the round head screws to release the anti-turning strips.
- Rotate the turret by using hand wheel.
- Remove the punches one by one through the hole and keep them on tray.
- Wipe the punches with lint free cloth followed by lint free cloth dipped in IPA.
- Finally wipe the punches with dry lint free cloth.
- REMOVAL OF DIES:
- Remove the die lock screw and Put die setting bar into the lower punch hole lightly hit the die such that die comes out of the disk.
- Remove the die screws with the help of Allen key.
- Place die bar through the punch hole and gently tap the dies till the dies comes out of the turret.
- Similarly remove all other dies and place them on trays.
- CLEANING OF MAIN BODY AND AREA:
- Clean the inner and outer surface of the equipment with vacuum cleaner to remove all the adhering material.
- Clean the turret (disc) with lint free cloth dipped in IPA to remove the adhering material.
- Clean the upper punch hole and lower punch hole with IPA and scrub using nylon brush.
- Wipe the holes with dry lint free cloth.
- Clean the turret die holes with IPA by using nylon brush until all the adhering material will removes.
- Wipe the other parts of the machine with lint free cloth dipped in 70% IPA.
- Wipe the control panel and acrylic doors with dry lint free cloth.
- Wipe acrylic doors with lint free cloth dipped in purified water.
- Clean the motors, pneumatic pipes and oil pipes with dry lint free cloth.
- Wipe the PLC panels and AWC panel with dry lint free cloth.
- Walls, ceiling, doors and glass shall be wipe with lint free cloth dipped in purified water.
- Area shall be moped with disinfectant solution.
- CLEANING OF PUNCHES AND DIES:
- Wipe the punches and dies with dry lint free cloth followed by wiping with lint free cloth dipped in IPA.
- Finally wipe with dry lint free cloth and apply food grade oil to punches and dies.
- Transfer the punches and dies to the change part cell.
- CLEANING OF DISMANTLED PARTS:
- Wash the hopper, tablet discharge chute, takeoff blade, scrapper assembly, recirculation blade and connectors with 100 L of potable water by using nylon scrubber to remove all adhering material.
- Rinse the parts with 50L of potable to remove all the adhering material.
- Finally rinse the parts with 30L of purified water, wipe with dry lint free cloth.
- Wash the feeder and its parts with 50L of potable water to remove all the adhering material.
- Finally rinse the parts with 50 L of purified water, wipe with dry lint free cloth.
- CLEANING OF HOSE PIPE:
- Wash the hosepipe with 30L of potable water.
- Finally rinse the hose pipe with 20 L of purified water and drain water completely from the pipe.
- Flush the inner and outer surface with compressed air to remove the water droplets. Hang the cleaned pipes on SS hook for complete drying.
- Finally wipe the hose pipe with dry lint free cloth.
- Clean the metal detector and deduster as per respective cleaning SOP.
- Cleaned parts shall be transferred to cleaned compression area after affixing “CLEANED” label.
- Reassemble the parts in the reverse order of dismantling.
- Update the status label to the equipment as CLEANED; Record the cleaning details in the equipment logbook.
- Update the status label to the equipment as CLEANED; Record the cleaning details in the equipment logbook.
- Note for Type B Cleaning:
- For Type B Cleaning first clean the equipment with lint free cloth then after clean with potable water. If needed the equipment surface can be rubbed with nylon brush or lint free cloth. If a product is not clean with water, then a cleaning agent can be added in potable water. Then after rinse with potable water and followed the rinsing of equipment with purified water. After rinsing equipment shall be dry with compressed air then wipe with lint free cloth. After drying the surface of equipment shall be wiped with 70% IPA.
- Frequency:
- After every batch of same product from higher to lower strength and lower to higher strength.
- For Product-to-Product changeovers.
- Major breakdown of equipment.
- As when required.
- REFERENCES:
- Not Applicable
- ANNEXURES:
| ANNEXURE NO | TITLE OF ANNEXURE |
| Annexure-I | Type B cleaning Work Sheet |
- ENCLOSURES: SOP Training Record.
- DISTRIBUTION:
- Controlled Copy No. 01 : Head Quality Assurance
- Controlled Copy No. 02 : Head Production
- Master Copy : Quality Assurance Department
- ABBREVIATIONS:
| QA | : | Quality Assurance |
| SS | : | Stainless Steel |
| IPA | : | Isopropyl Alcohol |
| No. | : | Number |
| SOP | : | Standard Operating Procedure |
- REVISION HISTORY:
- CHANGE HISTORY LOG
| Revision No. | Details of Changes | Reason for Change | Effective Date |
| 00 | New SOP | Not Applicable | To be written manual |
Annexure-I
TYPE B CLEANING WORK SHEET


