- OBJECTIVE:
- To lay down the procedure for Calibration of Tap density apparatus.
- SCOPE:
- This SOP is applicable to the procedure for Calibration of Tap density apparatus at {Company Name} {Location}.
- RESPONSIBILITY:
- Executive/Designee Quality Control is responsible to calibrate the instrument as per SOP.
- Head QC: Ensure the compliance of SOP.
- ACCOUNTABILITY:
QA Head shall be Accountable for implementation of SOP.
- PROCEDURE:
- Before switching on the instrument, check the area and instrument cleanliness.
- Connect the plug to the power supply and switch on the power.
- Operate the instrument as per SOP.
- The following parameters to be calibrated for Tap density apparatus:
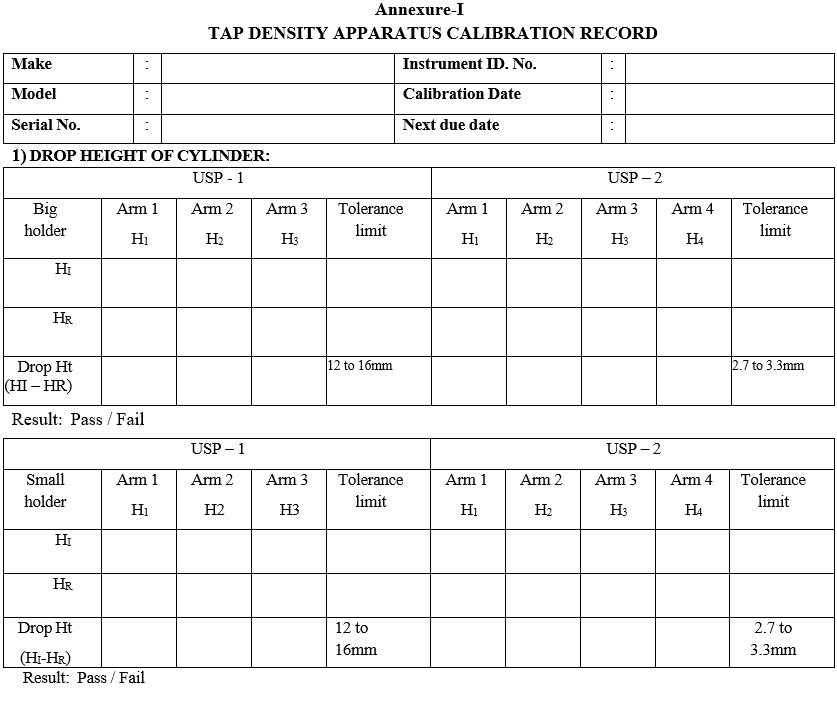
- Drop height of cylinder holder by using digital vernier caliper
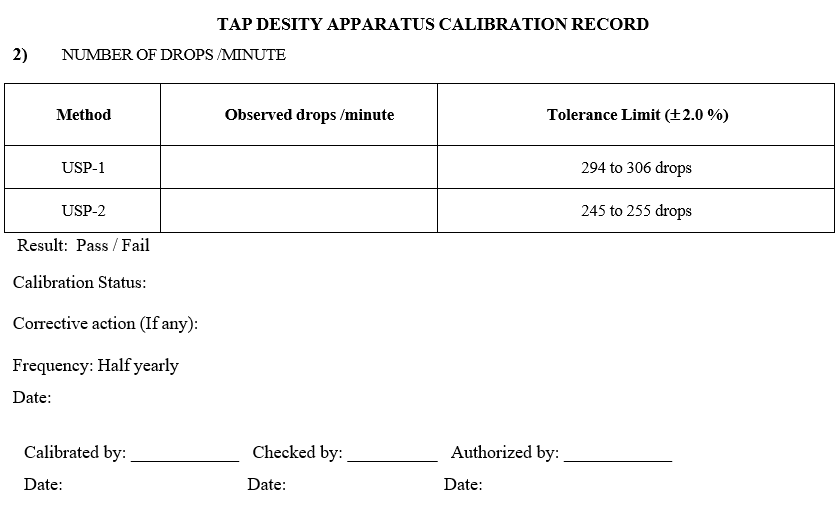
- Number of drops per minute by using stopwatch
- Calibration of Drop height of cylinder holder for USP method 1:
- Open the top cover by removing bottom screws.
- Turn the cam attached to the motor shaft clock wise, so that the cylinder holder shaft is at the minimum position.
- Make sure that the bottom plate of the cylinder holder is in perfect contact with the tapping platform.
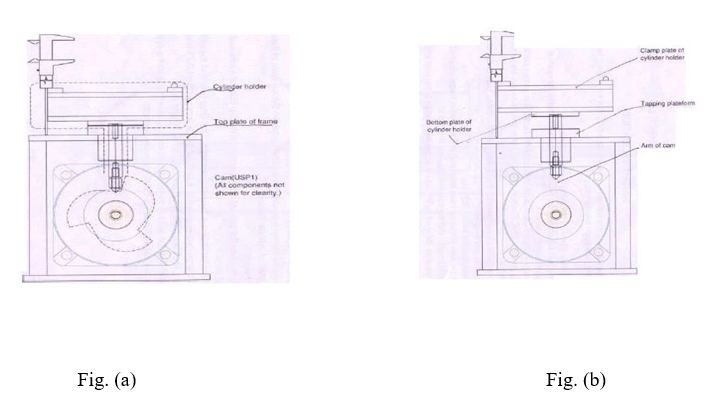
- Measure the distance between the top plate of frame and the clamp plate of cylinder holder by using digital vernier caliper; this reading is the base height (HR) as shown in figure (a).
- Rotate the cam further by hand, clockwise till the cylinder holder shaft reaches maximum height.
- At this position the shaft tip should be on the falling edge of the cam arm. Mark this arm No; 1 as shown in figure (b).
- Measure the distance between the top plate of frame and clamp plate of cylinder holder by using digital vernier caliper. This is height HI.
- Calibration of Drop height of cylinder holder for USP method 1:

- Make a mark on the point of measurement on the top plate of frame and on the cylinder plate.
- The difference between these two readings is drop height of the cylinder.
- Mark arms 1, 2 and 3 and heights H1, H2, H3 and so on. Repeat the above procedure for all arms with both cylinder holders.
- Make sure that the point of measurement on the top plate of frame and on the cylinder holder plate is maintained the same for all measurements.
- Record the results in the calibration format as per Format-I.

Click the link for download word file copy of this document:
https://pharmaguidehub.com/product/calibration-of-tap-density-apparatus/
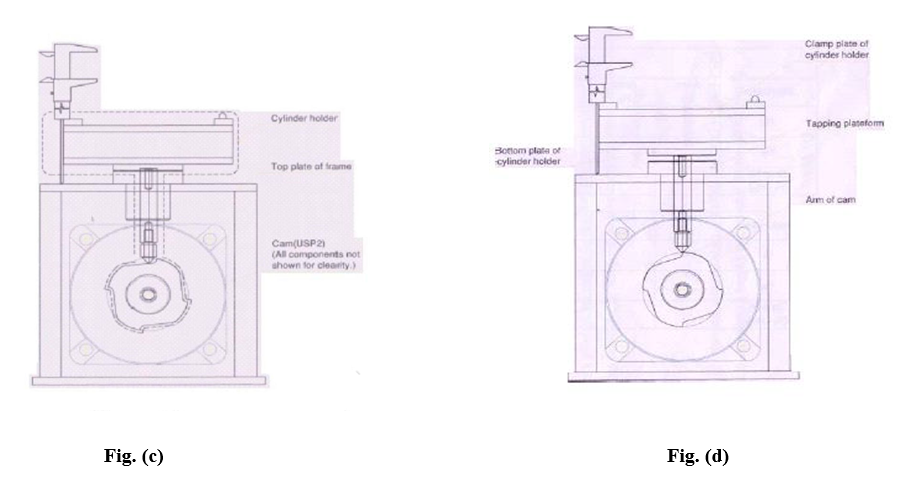
- Repeat the same procedure for all arms with both cylinder holder (figure c) and record the results in the calibration format.
- Calibration for Number of drops of cylinder holder per minute:
- Choose the mode menu to ‘USP1’ by using digital scroll key.
- Press set key, set taps count to 300.
- Press start key to start the tapping and start the stop watch.
- Stop the stop watch after 1 Minute and note down the number of drops.
- The number of taps should be 300 ± 6.
- Similarly choose the mode menu to ‘USP11’ by using digital scroll key.
- Press set key, set taps count to 250.
- Press start key to start the tapping and start the stop watch.
- Stop the stop watch after 1 Minute and note down the number of drops.
- The number of drops should be 250 ± 5.
- Calibration for Number of drops of cylinder holder per minute:
- REFERENCES:
Not Applicable
- ANNEXURES:
| ANNEXURE NO. | TITLE OF ANNEXURE |
| Annexure-I | Tap density apparatus Calibration Record |
ENCLOSURES: SOP Training Record.
- DISTRIBUTION:
- Controlled Copy No. 01 : Head Quality Assurance
- Controlled Copy No. 02 : Head Quality Control
- Master Copy : Quality Assurance Department
- ABBREVIATIONS:
| No. | : | Number |
| SOP | : | Standard Operating Procedure |
| QC | : | Quality Control |
- REVISION HISTORY:
CHANGE HISTORY LOG
| Revision No. | Details of Changes | Reason for Change | Effective Date |
| 00 | New SOP | Not Applicable | To Be Written Manual |
Annexure-I
TAP DENSITY APPARATUS CALIBRATION RECORD


Click the link for download word file copy of this document:
https://pharmaguidehub.com/product/calibration-of-tap-density-apparatus/
