OBJECTIVE:
To lay down a procedure for Calibration / Verification of flow meters.
SCOPE:
This SOP is applicable to the procedure for Calibration / Verification of flow meters at {Company Name} {Location}.
RESPONSIBILITY:
Officer/Executive/Designee: shall be responsible for following the procedure as per SOP.
Engineering Head/designee is responsible for compliance of SOP.
ACCOUNTABILITY:
QA Head shall be Accountable for implementation of SOP.
PROCEDURE:
A flow meter is a device that measures the rate at which a fluid (liquid or gas) moves through a pipe. In the pharmaceutical context, this fluid could be a raw material, a solvent, a reagent, or even a final product.
Importance of flow meter:
Process Control: Flow meters help maintain precise control over the flow rates of various fluids during manufacturing processes. This ensures that the correct quantities of ingredients are added at the right time, leading to consistent product quality.
Quality Assurance: Accurate flow measurement is essential for complying with strict quality control standards. It helps prevent deviations from specified formulations and ensures that the final product meets regulatory requirements.
Batch Consistency: By monitoring and controlling flow rates, flow meters contribute to the production of consistent batches of pharmaceuticals. This is crucial for maintaining product efficacy and safety.
Energy Efficiency: Flow meters can help optimize energy consumption by monitoring and adjusting fluid flow rates in various processes. This can lead to cost savings and reduced environmental impact.
Safety: Flow meters can be used to detect potential issues such as leaks or blockages in pipelines, which can pose safety risks.
General Procedure:
Identify the instruments which need to be calibrated against calibration schedule.
This flow meter is applicable to measure where water as a medium.
Ensure that the Standard Ultrasonic flow meter is in cleaned condition and calibration is within the validity period.
Ensure that Calibration/verification shall be done at the suitable environmental conditions.
Ensure that written requisition is obtained from the concerned user department (wherever required).
Calibration frequency shall be followed for flow meters as per the master calibration schedule.
Operation of Ultra sonic Flow meter (Make: Cryogenic, Model: PT200C):
Switch on the Flow meter using On/Off button provided on the Instrument.
Wait for few seconds till Menu Window Number-01 appears on the screen.
Press Menu key to display the window and its number.
In Window Number-01, Flow, Velocity, Signal strength(S) and quality (Q) will appear.
Press ENT key, to edit the user required window number.
For Settings M11 to M25 are to be adjusted to ensure the proper functioning of the instrument.
Steps to be followed while installing the transducers:
Place both the transducers at the defined calculated distance for accurate results.
Place the second transducer at the out let (labelled with blue color).
Place both the transducers at the defined calculated distance for accurate results.
Connect both the transducers output cables to the flow meter to measure the actual flow rate.
Measurement of pipe thickness:
Thickness of the pipe will be verified using the thickness gauge.
Switch on the instrument.
Ensure thickness gauge calibration before usage:
- Apply the gel on the surface of the standard 5 mm thickness area provided in the Instrument.
- Press ‘CAL’ button provided on the Instrument.
- Wait for few seconds, till coupling led will appear & CAL will disappear on the instruments display.
- Display shall show the value within +/- 0.1 mm variation to the actual value.
Calibrated instrument will be used to measure the thickness of the pipe.
Verification of Flow using the Ultra sonic flow meter:
Before verification ensure following parameters are measured and available:
- Diameter of the pipe shall be measured using Vernier scale/Measuring tape
- Note: Liner diameter (inner surface) shall be verified if piping is having with two different materials.
- Verify the construction material of the pipe where predefined options provided in the meter and same need to be selected in the reference flow meter.
- If respective material does not exist in the predefined options ‘Other’ can be selected as default.
- Note: In’ Other’ option, Sound level shall be calculated and to be provided accordingly in the meter (applicable only while opted other).
- Thickness of the pipe will be measured, using Thickness gauge
- Providing the pipe diameter and thickness of the pipe line, required distance between Tx and Rx will be calculated automatically in the Flow meter.
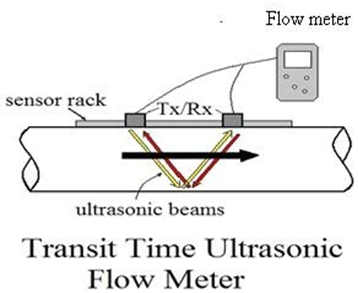
Place the both transmitter/receiver in the calculated distance (either in V –method (recommended) or Z –method or W –method) over the cleaned surface of the Pipe line.
V-Method (recommended): This method shall be used in measurement with pipe inner diameter ranging from 20 mm to 300 mm as shown in Figure-1.

Z-method: This method shall be used when the pipe diameter is between 300 mm to 500 mm.
W-method: This method is used on plastic pipes with a diameter from 10 mm to 100 mm.
Ensure that all the necessary arrangements before going to start calibration/verification as per required method.
Verify and compare the readings against under test and reference instrument (Ultrasonic).
Note down the readings in calibration certificate of SOP.
During measurement of value ensure the following requirements:
- Signal strength(S) should not be zero; zero indicates sensors are not communicating.
- Quality (Q) of signal should more than 60%.
If the Flow Meter found OUT OF CALIBRATION, it shall be informed to user and corrective action shall be followed as defined in the calibration procedure.
Acceptance Criteria: Acceptance criteria shall be considered ±3% of FSD. If the least count of the instrument is more than the acceptance criteria then its least count shall be taken as acceptance criteria.
Sign off the calibration certificate by the respective person’s responsibility.
File the approved Calibration Certificate with Calibration Lab.
Based on the Calibration results prepare the Calibration status label.
Affix/tag the Calibration status label and take the acknowledgement from the concerned in the Calibration requisition as per SOP.
File the Calibration Requisition format with Calibration Lab.
Ultrasonic flow meter: It works on the principle of transit time/flow technique, i.e. based on travelling time of signal from transmitter to receiver in a defined distance.
REFERENCES:
Not Applicable
ANNEXURES:
Not Applicable
ENCLOSURES: SOP Training Record.
DISTRIBUTION:
- Controlled Copy No. 01 : Head Quality Assurance
- Controlled Copy No. 02 : Head Engineering
- Master Copy : Quality Assurance Department
ABBREVIATIONS:
| No. | : | Number |
| FSD | : | Full Scale Division |
| Q | : | Quality |
| Rx | : | Receiver |
| Tx | : | Transmitter |
| mm | : | Millimeter |
| S | : | Signal Strength |
| e.g. | : | Example |
| SOP | : | Standard Operating Procedure |
REVISION HISTORY:
CHANGE HISTORY LOG
| Revision No. | Details of Changes | Reason for Change | Effective Date |
| 00 | New SOP | Not Applicable | To Be Written Manual |

