- OPERATING PROCEDURE OF CANTILEVER OCTAGONAL BLENDER:
- A cantilever octagonal blender is a type of industrial blender that uses an octagonal-shaped mixing vessel mounted on a cantilever arm. The cantilever arm allows the vessel to tilt and rotate, which creates a tumbling motion that efficiently blends dry ingredients together.
- Check for the cleanliness of the area and Equipment.
- Check that the required size of blender shall is in cleaned condition.
- Remove the “CLEANED” label and paste it into the BMR and affix “UNDER PROCESS” label.
- Transfer all the materials to be lubricated as per the BMR to the blending area.
- Set Up for 40/60/85ltrs Blender:
- Switch ON the power supply to the equipment by turn the control key to ON position and release the emergency button.
- Turn the remote key of Blender 40/60/85ltrs to ON position.
- Press UP button of blender 40/60/85ltrs to move the blender to upward position, press’ DOWN’ button to move the blender to down word position.
- Press and hold the DOWN button till the blender reaches to down position.
- Bring the required size of blender shell nearer to the blender along with trolley.
- Now clamp the blender shell to the blender frame and lock the frame with help of 2 hand wheels provided.
- Ensure that the blender shell is properly secured in the blender frame.
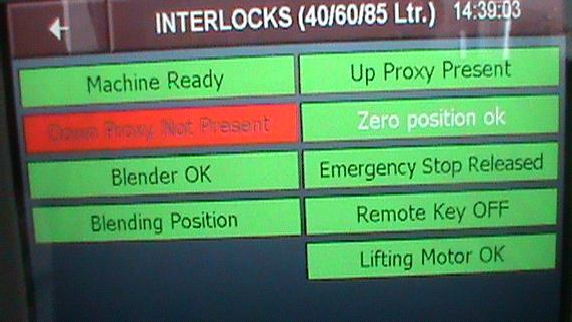
- Now press the UP button to move the blender shell to top most position, ensure that the ‘up proximity’ should be in green position in the interlock screen.
- Now remove the trolley from the blending area.Turn the remote key to OFF position.
- Close the rectangular blender lid with the help of the bolts.
- Ensure that the pneumatic butterfly valve is closed.
- NOTE:
- The machine will not operate without safety guards railing in position
- For smaller and finer movements use inch button for rotation.
- Set Up for blender 5/10/20ltrs:
- Fix the required size of blender bowl to the main motor shaft and clamp the stem with TC clamp.
- Close the rectangular lid and pneumatic butterfly valve properly.
- Connect the compressed air connection to the pneumatic butterfly valve.
- OPERATION:
- After turn on power supply the following screen will be displayed in the HMI.
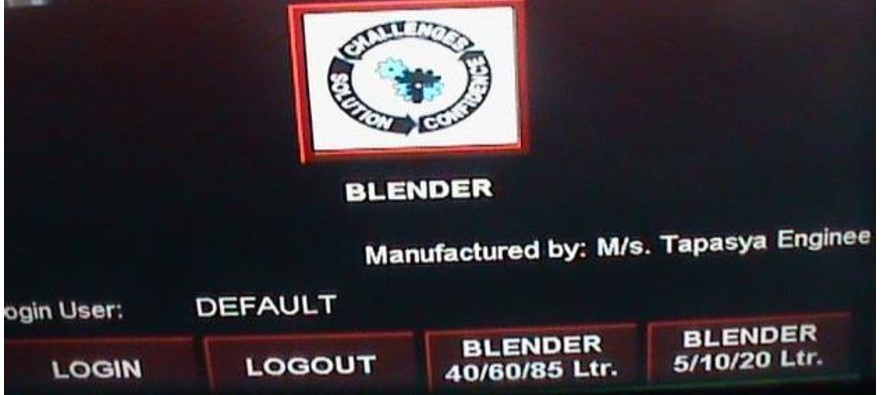
- Touch LOGIN button in the above screen then the following screen will be displayed.
- Touch User, password icon and enter the required level ,then press enter icon.
- Select the blender type by touching the required size of blender in the above screen, the following screen will be displayed.
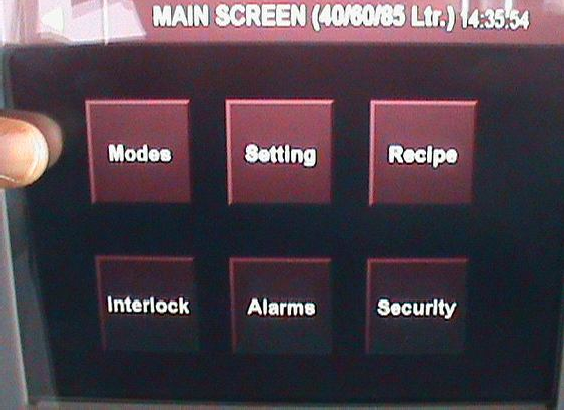
- Touch setting icon in the above screen for setting of blending time and blender speed.
- The following screen will be displayed.
- The following parameters can be entered in this screen.
1) Product Name: Enter the product name in tis column.
2) Batch No: Enter the batch number in this column.
Batch Size: Enter batch size in Kgs in this column.
4) Operator Name: operator name to be entered in this column.
5) Supervisor Name: Name of the supervisor to be entered in this column.
- Touch right arrow icon in the above screen then the following screen will be displayed.
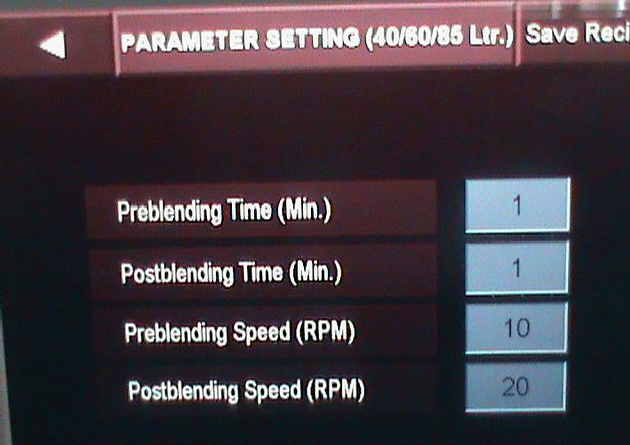
- The following parameters can be entered in this screen.
1) Preblending Time (Min): Enter the pre blending time in this column.
2) Post blending time (Min): Enter the post blending time in this column.
3) Preblending speed (RPM): Enter the blender speed during pre blending.
4) Post blending speed (RPM): Enter the blender speed during post blend cycle.
- After entering all the above parameters, press Save Recipe Icon to save the recipe.
- The following screen will be displayed for recipe save.
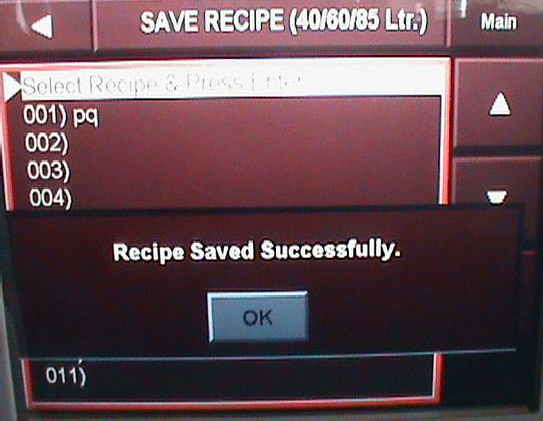
- Save the recipe by touching up/down arrow keys and followed by pressing enter key. The message “Recipe Saved Successfully” will be displayed.
- To go back to the main screen touch the left arrow key.
- Touch the RECIPE icon in the main screen and load the required recipe for blending operation.
- Touch the MODES icon in the main screen then the following screen will be displayed.
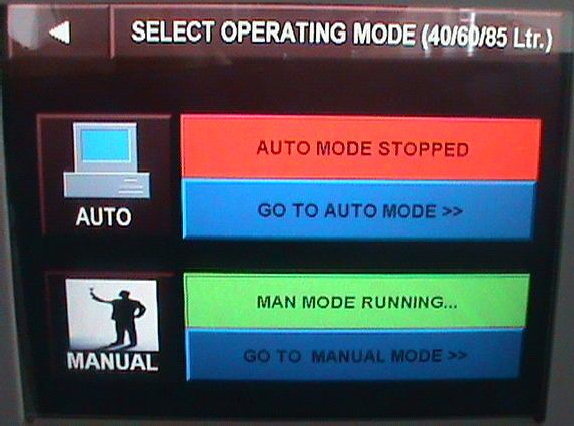
- Touch ‘MANUAL’ Mode icon and touch ‘go to manual mode’ icon in the above screen the following screen will be displayed.
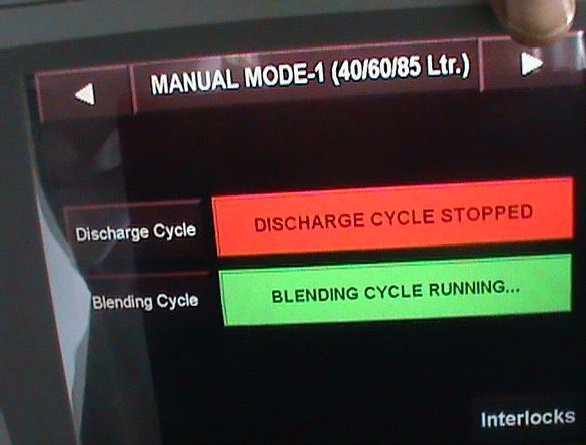
- Touch the Blending cycle icon, then the blending cycle running indication will display in green indication.
- Touch the right arrow key then enter the blender speed, start the blending by touch the start icon.
- For inching of blender touch inch icon in manual mode.
- Touch left arrow key and go to blender mode screen and select the operation mode to AUTO. the following screen will be displayed.
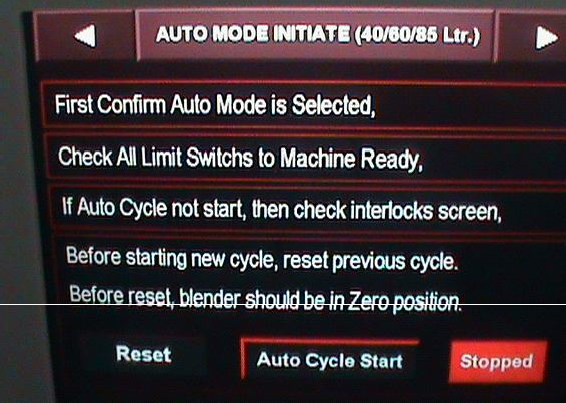
- Touch Reset icon in the above screen, then a dialogue screen will be displayed, press Yes icon the previous cycle will be resettled.
- Touch Auto cycle start icon in the above careen the following screen will be displayed.
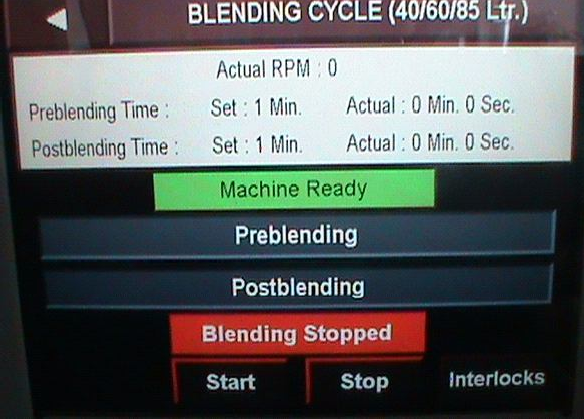
- Touch blending start icon, then the pre blending cycle will be started, after completion of pre blending cycle again touch start icon the post blending cycle will be started.
- Touch interlock icon in the above screen the following screen will be displayed.
- Touch ALARM icon in the main screen then the following screen will be displayed
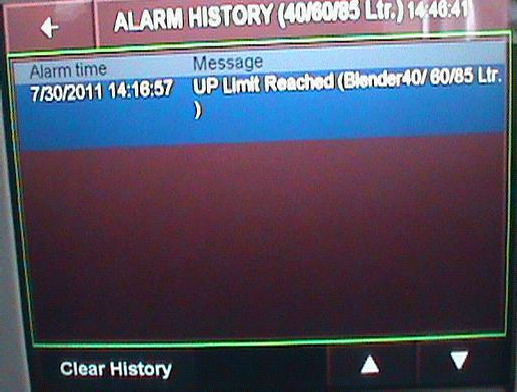
- Touch Clear History Icon to clear the alarm history.
- LOADING OF THE MATERIAL:
- Bring the discharge port to down. Ensure that the butterfly valve is closed.
- For manual loading, open the rectangular lid of the blender and load the material in to blender with help of cleaned scoop.
- After loading of material close the rectangular lid and lock with bolts.
- For loading with canister, bring the loaded canister nearer to the blender and keep below the locking arrangement base.
- To Clamp the canister with the octa bowl, lift the canister by pressing the lifting handle provided at the bottom of the blender frame. Manually.
- Clamp the canister with octa bowl with triclover clamp. After clamping take down the lifting base.
- Rotate the blender in manual mode by using INCH button and stop the blender when it reaches to upright position.
- Now open the pneumatic butterfly valve to discharge the material in to the blender.
- After charging is over close the pneumatic valve.
- Repeat the same procedure for remaining charges.
- After complete loading of the material close the butterfly valve properly. And inch the blender so that bin comes downside.
- BLENDING:
- Ensure the all blend which is to be blended are loaded into the blender with appropriate lubricants.
- Ensure the safety railing is properly fixed. Put the blender remote key to OFF position.
- Go to main menu screen and touch the recipe icon. Select the recipe and Load the recipe by touching load icon.
- Touch the Modes Icon in the main screen and select AUTO mode and select the blending cycle.
- Touch Right arrow key and touch Reset Icon to reset the previous process.
- Touch ‘Auto Cycle start’ icon and then touch blending start icon to start the blending.
- After completion pre blending cycle, open the rectangular lid of blender and add lubricants as per BMR.
- Close the rectangular lid and lock with bolts tightly.
- Now start the post blend cycle by pressing start icon.
- Blender will automatically stops after completion of the set time.
- UNLOADING OF THE BLEND:
- Put the remote selector switch in the ON position.
- Place double lined pre labelled S.S. Bin/HDPE container below the discharge butterfly valve.
- Tie one end of the cloth bellow to the discharge of the blender and tie the other end to the mouth of the S.S. Bin.
- Slowly open the butterfly valve, by pressing push button on panel frame.
- Empty the contents of the blender into the S.S. Bin, and label accordingly.
- Record the operation details s in the equipment logbook.
- NOTE: Check that the mains are switched off after complete operation of the blender
- Remove the “UNDER PROCESS” label and affix the “TO BE CLEANED” label to the machine.
- PRECAUTION:
- Check that no person is inside the safety railing and that there is no obstruction to the rotating blender.
- Check that all the materials to be mixed are loaded in the blender as per BMR before starting the operation.
- Switch off main supply to the machine before unloading the content of blender and open the safety railing.
- ABBREVIATIONS:
| No. | : | Number |
| SS | : | Stainless steel |
| BMR | : | Batch manufacturing record |
| BPR | : | Batch packing record |
| SOP | : | Standard Operating Procedure |
